
Behavior Driven Development (BDD) is a practice in which developers and QA testers write automated user acceptance tests (UAT) which satisfy acceptance criteria in user stories. This helps developers write code that is focused on satisfying business criteria which define the purpose of the software they are writing. As with Test Driven Development (TDD), BDD tests are often written prior to developers writing any code. In contrast to unit tests, where external dependencies are discouraged, BDD tests are integration tests in which web services and database connections are used. They are written in a natural language, called Gherkin (with Given-When-Then syntax), that is understandable to non-technical audiences and can be wired to tests that are executed in an automated fashion.
Note: You can download the code for this blog post by cloning the accompanying GitHub repository: https://github.com/tonysneed/Demo.SpecFlowWebApi
In this blog post I will show you how to use SpecFlow to create BDD tests for an ASP.NET Web API project. This will be in addition to BDD tests you might create with SpecFlow and Selenium for driving a web UI built using a SPA framework such as Angular. The reason for building separate Web API tests is that, from an architectural perspective, a Web API constitutes a distinct application layer which may be consumed by any number of different clients, both visual and non-visual. As such, Web API’s should have their own user stories with acceptance criteria that apply to the REST interface.
What makes it challenging to write Specflow tests for a Web API is that you need to configure an in-memory test server using a WebApplicationFactory and wire it up to SpecFlow’s dependency injection system in order to make it available to step definition classes. You also need to bring in an appsettings.json file with values that override those in the Web API project so that you can use a test database instead of the real one. Finally, there is the challenge of using JSON files in the SpecFlow project for the body of HTTP requests and expected responses. Rest assured you’ll be able to meet these challenges, because this blog post will describe precisely how to do these things.
SpecFlow is a popular tool for automating BDD tests with .NET. It comes as a plugin for Integrated Development Environments (IDE’s) such as Microsoft Visual Studio and JetBrains Rider.

After installing the plugin, simply add a new project to your solution by selecting the SpecFlow project template. Be sure to specify .NET 6 for the framework together with xUnit as the testing framework.

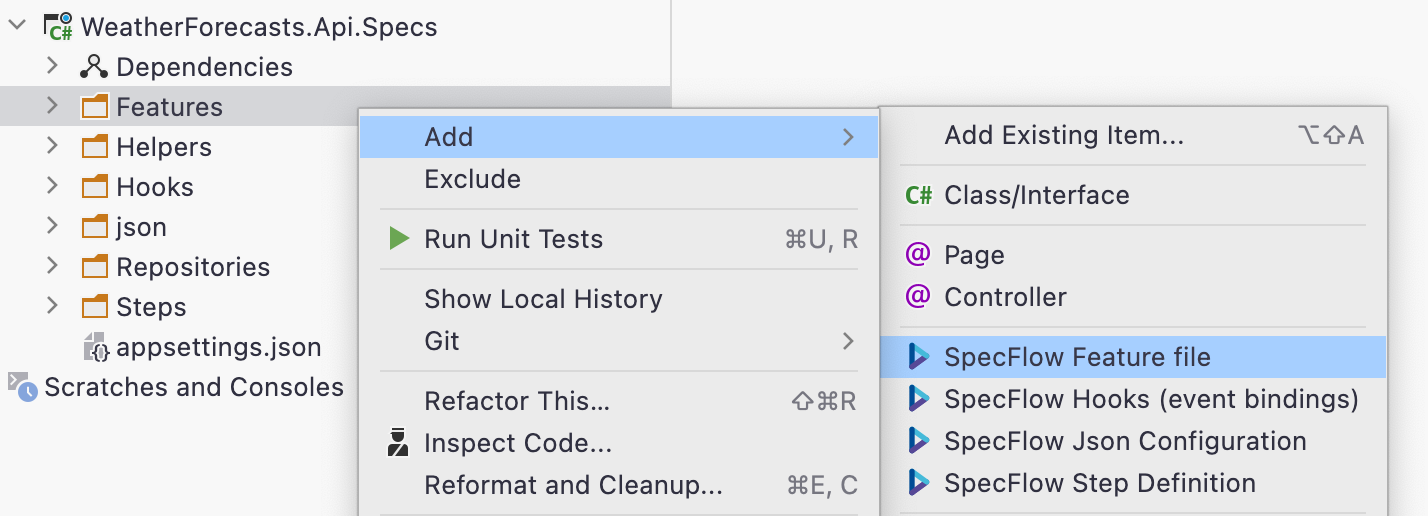
Right-click on the Features folder to add a SpecFlow Feature file.
This is where you’ll add scenarios in Given-When-Then format. These should match acceptance criteria contained in the user stories for your Web API. At first you’ll see yellow squiggly lines underlining each statement. This is because you have not yet created any step definitions. The IDE will provide a handy context menu for creating steps for each statement. You’ll want to create a new binding class in which to place the first step.

If you haven’t done so already, you’ll need to add a new Web API project to the solution. Because .NET 6 does away with the Startup class, you need to modify the Program class in order for the SpecFlow project to “see” it. First, add a public partial Program class to the Program.cs file.
This file contains hidden or bidirectional Unicode text that may be interpreted or compiled differently than what appears below. To review, open the file in an editor that reveals hidden Unicode characters.
Learn more about bidirectional Unicode characters
| public partial class Program { } |
Next add the following to the Web API .csproj file, replacing the value with the name of your SpecFlow project.
This file contains hidden or bidirectional Unicode text that may be interpreted or compiled differently than what appears below. To review, open the file in an editor that reveals hidden Unicode characters.
Learn more about bidirectional Unicode characters
| <ItemGroup> | |
| <InternalsVisibleTo Include="SpecFlowWebApi.Specs" /> | |
| </ItemGroup> |
The new Web API project template includes a weather forecasts controller. In my sample I updated the project to use a repository interface with an implementation that persists entities to a MongoDB database.
This file contains hidden or bidirectional Unicode text that may be interpreted or compiled differently than what appears below. To review, open the file in an editor that reveals hidden Unicode characters.
Learn more about bidirectional Unicode characters
| public interface IWeatherRepository | |
| { | |
| Task<IEnumerable<WeatherForecast>> GetAsync(); | |
| Task<WeatherForecast?> GetAsync(int id); | |
| Task<WeatherForecast?> AddAsync(WeatherForecast entity); | |
| Task<WeatherForecast?> UpdateAsync(WeatherForecast entity); | |
| Task<int> RemoveAsync(int id); | |
| } |
Next you’ll need to go to the step definitions class in the SpecFlow project and add parameters for IWeatherRepository and WebApplicationFactory<Program>. The latter is required to create an in-memory test server for the integration tests. In addition, you can add a constructor parameter for a JsonFilesRepository, which is a helper class I created to retrieve the contents of JSON files from a project folder. SpecFlow tests can use these files both for input parameters and expected results returned by REST endpoints in your Web API project.
This file contains hidden or bidirectional Unicode text that may be interpreted or compiled differently than what appears below. To review, open the file in an editor that reveals hidden Unicode characters.
Learn more about bidirectional Unicode characters
| public class JsonFilesRepository | |
| { | |
| private const string Root = "../../../json/"; | |
| public Dictionary<string, string> Files { get; } = new(); | |
| public JsonFilesRepository(params string[] files) | |
| { | |
| var filesList = files.ToList(); | |
| if (!filesList.Any()) | |
| foreach (var file in Directory.GetFiles(Root)) | |
| filesList.Add(Path.GetFileName(file)); | |
| foreach (var file in filesList) | |
| { | |
| var path = Path.Combine(Root, file); | |
| var contents = File.ReadAllText(path); | |
| Files.Add(file, contents); | |
| } | |
| } | |
| } |
Here are the contents of the weather.json file used to create a new WeatherForecast by means of a POST controller action.
This file contains hidden or bidirectional Unicode text that may be interpreted or compiled differently than what appears below. To review, open the file in an editor that reveals hidden Unicode characters.
Learn more about bidirectional Unicode characters
| { | |
| "id": 1, | |
| "date": "2022-01-01T06:00:00Z", | |
| "temperatureC": 32, | |
| "temperatureF": 89, | |
| "summary": "Freezing", | |
| "eTag": "6e9eff61-a3ed-4339-93fb-24151149b46c" | |
| } |
The complete step definitions class should look like the following. (Some methods are elided for clarity.)
This file contains hidden or bidirectional Unicode text that may be interpreted or compiled differently than what appears below. To review, open the file in an editor that reveals hidden Unicode characters.
Learn more about bidirectional Unicode characters
| [Binding] | |
| public class WeatherWebApiStepDefinitions | |
| { | |
| private const string BaseAddress = "http://localhost/"; | |
| public WebApplicationFactory<Program> Factory { get; } | |
| public IWeatherRepository Repository { get; } | |
| public HttpClient Client { get; set; } = null!; | |
| private HttpResponseMessage Response { get; set; } = null!; | |
| public JsonFilesRepository JsonFilesRepo { get; } | |
| private WeatherForecast? Entity { get; set; } | |
| private JsonSerializerOptions JsonSerializerOptions { get; } = new JsonSerializerOptions | |
| { | |
| AllowTrailingCommas = true, | |
| PropertyNameCaseInsensitive = true | |
| }; | |
| public WeatherWebApiStepDefinitions( | |
| WebApplicationFactory<Program> factory, | |
| IWeatherRepository repository, | |
| JsonFilesRepository jsonFilesRepo) | |
| { | |
| Factory = factory; | |
| Repository = repository; | |
| JsonFilesRepo = jsonFilesRepo; | |
| } | |
| [Given(@"I am a client")] | |
| public void GivenIAmAClient() | |
| { | |
| Client = Factory.CreateDefaultClient(new Uri(BaseAddress)); | |
| } | |
| [Given(@"the repository has weather data")] | |
| public async Task GivenTheRepositoryHasWeatherData() | |
| { | |
| var weathersJson = JsonFilesRepo.Files["weathers.json"]; | |
| var weathers = JsonSerializer.Deserialize<IList<WeatherForecast>>(weathersJson, JsonSerializerOptions); | |
| if (weathers != null) | |
| foreach (var weather in weathers) | |
| await Repository.AddAsync(weather); | |
| } | |
| [When(@"I make a GET request with id '(.*)' to '(.*)'")] | |
| public async Task WhenIMakeAgetRequestWithIdTo(int id, string endpoint) | |
| { | |
| Response = await Client.GetAsync($"{endpoint}/{id}"); | |
| } | |
| [When(@"I make a POST request with '(.*)' to '(.*)'")] | |
| public async Task WhenIMakeApostRequestWithTo(string file, string endpoint) | |
| { | |
| var json = JsonFilesRepo.Files[file]; | |
| var content = new StringContent(json, Encoding.UTF8, MediaTypeNames.Application.Json); | |
| Response = await Client.PostAsync(endpoint, content); | |
| } | |
| [Then(@"the response status code is '(.*)'")] | |
| public void ThenTheResponseStatusCodeIs(int statusCode) | |
| { | |
| var expected = (HttpStatusCode)statusCode; | |
| Assert.Equal(expected, Response.StatusCode); | |
| } | |
| [Then(@"the location header is '(.*)'")] | |
| public void ThenTheLocationHeaderIs(Uri location) | |
| { | |
| Assert.Equal(location, Response.Headers.Location); | |
| } | |
| [Then(@"the response json should be '(.*)'")] | |
| public async Task ThenTheResponseDataShouldBe(string file) | |
| { | |
| var expected = JsonFilesRepo.Files[file]; | |
| var response = await Response.Content.ReadAsStringAsync(); | |
| var actual = response.JsonPrettify(); | |
| Assert.Equal(expected, actual); | |
| } | |
| } |
The Web API project has an appsettings.json file in which a WeatherDatabaseSettings section is present with values for a MongoDB connection string, database name and collection name. You can add a matching appsettings.json file to your SpecFlow project in which you replace the value for DatabaseName with a test database used exclusively for the integration testing.
This file contains hidden or bidirectional Unicode text that may be interpreted or compiled differently than what appears below. To review, open the file in an editor that reveals hidden Unicode characters.
Learn more about bidirectional Unicode characters
| { | |
| "WeatherDatabaseSettings": { | |
| "ConnectionString": "mongodb://localhost:27017", | |
| "DatabaseName": "WeathersTestDb", | |
| "CollectionName": "Weathers" | |
| } | |
| } |
You’ll need to add a WeatherHooks.cs file to the Hooks folder, so that you can add instances of WebApplicationFactory<Program>, IWeatherRepository and JsonFilesRepository to the SpecFlow dependency injection system. My sample contains a GetWebApplicationFactory method for configuring a WebApplicationFactory<Program> using an appsettings.json file bound to a strongly typed WeatherDatabaseSettings class.
This file contains hidden or bidirectional Unicode text that may be interpreted or compiled differently than what appears below. To review, open the file in an editor that reveals hidden Unicode characters.
Learn more about bidirectional Unicode characters
| private WebApplicationFactory<Program> GetWebApplicationFactory() => | |
| new WebApplicationFactory<Program>() | |
| .WithWebHostBuilder(builder => | |
| { | |
| IConfigurationSection? configSection = null; | |
| builder.ConfigureAppConfiguration((context, config) => | |
| { | |
| config.AddJsonFile(Path.Combine(Directory.GetCurrentDirectory(), AppSettingsFile)); | |
| configSection = context.Configuration.GetSection(nameof(WeatherDatabaseSettings)); | |
| }); | |
| builder.ConfigureTestServices(services => | |
| services.Configure<WeatherDatabaseSettings>(configSection)); | |
| }); |
The WeatherHooks class also contains a ClearData method which, as the name suggests, clears data from the test database before each scenario is run.
This file contains hidden or bidirectional Unicode text that may be interpreted or compiled differently than what appears below. To review, open the file in an editor that reveals hidden Unicode characters.
Learn more about bidirectional Unicode characters
| private async Task ClearData( | |
| WebApplicationFactory<Program> factory) | |
| { | |
| if (factory.Services.GetService(typeof(IWeatherRepository)) | |
| is not IWeatherRepository repository) return; | |
| var entities = await repository.GetAsync(); | |
| foreach (var entity in entities) | |
| await repository.RemoveAsync(entity.Id); | |
| } |
Lastly, the WeatherHooks class has a constructor that accepts an IObjectContainer and a RegisterServices method that registers WebApplicationFactory<Program>, IWeatherRepository and JsonFilesRepository as services with SpecFlow DI so they can be injected into step definition classes.
This file contains hidden or bidirectional Unicode text that may be interpreted or compiled differently than what appears below. To review, open the file in an editor that reveals hidden Unicode characters.
Learn more about bidirectional Unicode characters
| [Binding] | |
| public class WeatherHooks | |
| { | |
| private readonly IObjectContainer _objectContainer; | |
| private const string AppSettingsFile = "appsettings.json"; | |
| public WeatherHooks(IObjectContainer objectContainer) | |
| { | |
| _objectContainer = objectContainer; | |
| } | |
| [BeforeScenario] | |
| public async Task RegisterServices() | |
| { | |
| var factory = GetWebApplicationFactory(); | |
| await ClearData(factory); | |
| _objectContainer.RegisterInstanceAs(factory); | |
| var jsonFilesRepo = new JsonFilesRepository(); | |
| _objectContainer.RegisterInstanceAs(jsonFilesRepo); | |
| var repository = (IWeatherRepository)factory.Services.GetService(typeof(IWeatherRepository))!; | |
| _objectContainer.RegisterInstanceAs(repository); | |
| } |
You can execute the SpecFlow tests from the IDE Test Explorer, just as you would unit tests. This also allows you to debug individual tests and hit breakpoints both in the SpecFlow and Web API projects.

In this blog post I have shown you how to use SpecFlow to create user acceptance tests for BDD with a .NET 6 Web API project. By following the steps outlined here and in my sample, you’ll be able to configure a test web server for hosting your Web API and creating an HTTP client to invoke controller actions, with data is saved to a test database and results compared to JSON files added to the SpecFlow project. Now you can fearlessly add automated integration tests written in Gherkin syntax to help ensure that your Web API’s continue to meet acceptance criteria and deliver functionality that is targeted to the business domain.
Happy coding. 😀


