API Improvements in Trackable Entities v1.01

I’d like to announce version 1.01 of Trackable Entities, which fixes a few issues and adds two methods to the API.

  • DbContext.AcceptChanges: You want to call this method after performing inserts or updates in service operations (Web API or WCF), so that the state of each entity in the object graph is returned to Unchanged.  This is done so that the entity is returned to the client is ready for additional updates.
_dbContext.ApplyChanges(product);
_dbContext.SaveChanges();
product.AcceptChanges();
  • ChangeTrackingCollection.MergeChanges: This method should be called on the client-side after entities are returned from an update operation.  This is needed in the case where you first call GetChanges on the change tracker so that you can pass only changed items (inserts, updated and deletes) to a service update operation. After you get back the updated entities, you usually want to merge them back into entities which contain unchanged items which were not sent to the service. That’s where MergeChanges comes in.  MergeChanges will combine changed and unchanged items into a single set of entities, with tracking state set to Unchanged and no cached deletes.  This takes place in reverse – unchanged entities are merged into the set of entities returned by the update operation. This is needed because client-side entities are completely persistence-ignorant, and by design we don’t know which properties represent the entity key.

// Submit changes var changedOrder = changeTracker.GetChanges().SingleOrDefault(); var updatedOrder = UpdateOrder(client, changedOrder); // Merge changes changeTracker.MergeChanges(ref createdOrder, updatedOrder);

After calling MergeChanges, both createdOrder and updatedOrder point to an order entity which contains details that were not sent to the service and remain in the same state as before, as well as added, modified and deleted details that were returned from the service after having been persisted and contain database-generated values for identity and concurrency.

Posted in Technical | Tagged | Leave a comment

Simple MVVM Toolkit v 5.0 for VS 2013

Update: The VSIX installer for version 5.5.0.1 of Simple MVVM Toolkit includes the toolkit code snippets! They are included as a pkgdef (VS add-in). So after installing the toolkit, press Ctrl+K, Ctrl+X and select a C# or XAML snippet from the Mvvm folder (or just type the C# code snippet name).  Note that if you are using ReSharper, you will need to select RESHARPER, Options, Environment, Intellisense, General, and select Visual Studio.

Simple MVVM Toolkit v5.0 for Visual Studio 2013 is now published! There is support for WPF 4-4.51, Silverlight 5, Windows Store 8.1 and Windows Phone 8. Come and get it! https://simplemvvmtoolkit.codeplex.com/

Adding support for Windows Store 8.1 and Windows Phone 8 was not that difficult. This was due primarily to the work that had been done in v4 of the toolkit, namely, placing as much functionality as possible in the SimpleMvvmToolkit-Common assembly, which is a portable class library.  For the common library I set target framework compatibility to .NET Framework 4.5 and higher, Silverlight 5, Windows Phone 8, and Windows Store (Windows 8) and higher.

One thing, however, that differs among these frameworks is how to marshal code that is running on a background thread back onto the main UI thread.  For standard code-behind, this made much easier by the async / await pattern, which handles the marshaling automatically. However, it is not as easy when setting a view-model property from a background thread.  You would have to get onto the UI thread by placing the code to set the property after the await statement.  That’s not really too much to ask, but wouldn’t it be easier if you didn’t have to think about it? Shouldn’t the framework would handle the marshaling for you?

That is precisely what Simple MVVM Toolkit does. Smile But to make the magic happen, some things need to take place under the covers, and there are some differences between Silverlight and other frameworks, such as WPF, Windows Store and Windows Phone 8.  The latter require that you initialize the dispatcher while on the main UI thread. To allow this, UIDispatcher has an Initialize method, which you should call at app startup.

#if !SILVERLIGHT
    /// <summary>
    /// Invoke from main UI thread.
    /// </summary>
    public static void Initialize()
    {
        #if NETFX_CORE
        WindowsDispatcher windowsDispatcher = CoreWindow.GetForCurrentThread().Dispatcher;
        #else
        WindowsDispatcher windowsDispatcher = WindowsDispatcher.CurrentDispatcher;
        #endif
        _dispatcher = new UIDispatcher(windowsDispatcher);
    }
#endif

One goal of mine was to add support for Windows Store and Windows Phone 8, but another pressing concern was to address the difficulties some users experienced trying to install v3 and v4 of the toolkit.  The download to those versions is an MSI installer created using InstallShield.  Unfortunately, Microsoft removed the built-in installation templates from Visual Studio, and the “express” edition of InstallShield pulled in dependencies from the machine on which the installer was created. The end result was that .NET Framework assemblies were removed by the installer when the user uninstalled the toolkit – yikes! There were also issues with the placement of the project templates in the user’s personal folder.

To address these issues and create a smother installation experience, I decided to deploy v5 of the toolkit as a VSIX – Visual Studio Extension. (I also intend to re-deploy v3 and v4 of the toolkit as VSIX’s.) This solves the main problem of unintended dependencies, as well as the placement of project templates.  It also removes the need to install the template wizard in the Global Assembly Cache, because it can be included with the VSIX installer.

This prompted me to re-think another aspect of the installer, which was creating registry entries so that the toolkit assemblies would show up in the Add References dialog.  To solve that, I turned to NuGet. It’s possible to include NuGet packages in a VSIX file and configure the project templates to pull them in. I also was able to consolidate all versions of the toolkit into a single NuGet package: SimpleMvvmToolkit.  That’s because a single package can contain multiple assemblies, each targeting a different platform. NuGet knows how to install the right assemblies based on the framework of the project using the package.

There are some trade-offs in the decision to use VSIX and NuGet. The main one is that VSIX does not support the installation of code snippets.  So what I plan to do is instead create a VSI file for the code snippets.  Secondly, it’s not practical to use a VSIX for installing things like samples and source code.  So I simply added them as separate downloads from the CodePlex site.

One last change to the toolkit is with the source code repository on CodePlex.  I had been using TFS for source code control, but the repository only included the class libraries and not other artifacts, such as NuGet packages and installers. I hesitated to redo the directory structure because of how difficult it is to do in TFS.  I also had several developers who wanted to contribute to the project, so switching to a distributed system like Git started to make sense.

It took some time to learn the in’s and out’s of Git, but the effort was well worth it. CodePlex recently added support for Git and has a nice set of instructions. I asked the kind folks at CodePlex to remove the existing TFS repo and replace it with a Git repo. After installing Git for Windows and TortoiseGit, I cloned the repo locally, added the files, committed them, and pushed them up to CodePlex. It was incredibly easy to do.

This makes it more straightforward for anyone wanting to contribute to the project.  All you have to do is fork it, create a local branch, make your changes, then issue a pull request, which I can evaluate and them merge into the main branch.

Enjoy.

Posted in Technical | Tagged | 7 Comments

Trackable Entities Version 1.0 Released!

I am pleased to announce the release of Trackable Entities version 1.0 – with support for both WCF and ASP.NET Web API with Visual Studio 2012 and 2013!

VS 2013 Extensions

The idea behind this tool is simple: enable you to build n-tier applications quickly and easily, with entities that are change-tracked on the client in a persistence-ignorant fashion, then sent to a web service where they can be updated in a batch operation within a single transaction.  The classic example is an Order with OrderDetails.  The parent order may or may not have any changes, but the details could include new items, removed items and modified items.  These should be persisted in an atomic fashion within the same transaction.  If saving one of the items fails (for example because of invalid data), then all the updates should be rolled back.

Let’s start off with getting one thing straight: these have nothing to do with the now defunct Self-Tracking Entities that were once part of the Entity Framework.  The goal of that project was noble, but the implementation was flawed, resulting in bloated code with rather tight coupling to the framework, similar to when ADO.NET DataSets were used to send entities across service boundaries.  The problem is that, because STE’s were implemented poorly, the very idea of client-side change-tracking and batch updates fell out of favor.  To add insult to injury, the EF team decided to deprecate STE’s instead of redesigning them.

This is where my solution to the problem comes in: Trackable Entities.  Contrary to STE’s, Trackable Entities are completely platform neutral and carry very little overhead: just an enum property for entity state, and optionally a list of properties that have been modified (which is needed for partial updates to the database).  Another difference is that instead of inserting a change-tracker into each entity (like STE’s did), Trackable Entities sports a separate ChangeTrackingCollection<T>, which is responsible for setting entity state transparently, as items are added, removed or modified.  And it has a GetChanges method, so that only entities that have changes are sent to the server, instead of all the entities (like STE’s did).

But if Microsoft dropped support for Self-Tracking Entities, doesn’t that mean change-tracking and batch updates for entities is generally a bad idea?  Well, tell that to the OData team, which included these features in Data Services.  That product has a client-side change tracker which adds metadata to requests for batch updates.

So why not just use OData? The purpose of OData is essentially to expose an entity data model as a REST service. But you end up basically exposing your database to ad hoc queries, which may not be what you want.  My approach instead builds on the service model of ASP.NET Web API, with a T4 template for generating controller actions for data persistence.  This give you a great deal more control.

The core functionality of Trackable Entities is deployed as a set of NuGet packages, but the killer feature is the productivity tools provided by the project templates installed by a VSIX Visual Studio extension.  There are two child project templates: Client.Entities, a portable class library compatible with .NET 4, SL5, WP8 and Win8.  It includes a custom T4 template, which is executed by the Entity Framework Power Tools when reverse engineering database tables into Code First entities.  This template generates classes that implement INotifyPropertyChanged and ITrackable, so that the ChangeTrackingCollection can do its magic.  Similarly, there is a Service.Entities project template includes a T4 template which the EF Power Tools uses to generate server-side entities.

VS 2013 Projects

While those project templates are nice, they aren’t the best part. There are also multi-project templates for creating turn-key n-tier applications based on either WCF or ASP.NET Web API.  When you create a project based on one of these two templates, you get custom T4 templates for generating services with CRUD operations.  For Web API, you add the same template as you would for a Controller that uses Entity Framework.

vs2013-api2

The T4 template, however, generates code that is much better than what the default template generates.  For example, POST (insert) and PUT (update) methods each return an updated entity that includes database-generated values (for identity or concurrency).  Also, my T4 template inserts Include operators for bringing back related entities (for example, Product would include the related Category entity).  (You need to add Includes for child entities yourself.)

Here’s an example of the Web API Controller generated for the Product entity.

public class ProductController : ApiController
{
    private readonly NorthwindSlimContext _dbContext = new NorthwindSlimContext();

    // GET api/Product
    [ResponseType(typeof(IEnumerable<Product>))]
    public async Task<IHttpActionResult> GetProducts()
    {
        IEnumerable<Product> products = await _dbContext.Products
            .Include(p => p.Category)
            .ToListAsync();

        return Ok(products);
    }

    // GET api/Product/5
    [ResponseType(typeof(Product))]
    public async Task<IHttpActionResult> GetProduct(int id)
    {
        Product product = await _dbContext.Products
            .Include(p => p.Category)
            .SingleOrDefaultAsync(p => p.ProductId == id);

        if (product == null)
        {
            return NotFound();
        }
        return Ok(product);
    }

    // PUT api/Product
    [ResponseType(typeof(Product))]
    public async Task<IHttpActionResult> PutProduct(Product product)
    {
        if (!ModelState.IsValid)
        {
            return BadRequest(ModelState);
        }

        try
        {
            // Update object graph entity state
            _dbContext.ApplyChanges(product);
            await _dbContext.SaveChangesAsync();
            return Ok(product);
        }
        catch (DbUpdateConcurrencyException)
        {
            if (!_dbContext.Products.Any(p => p.ProductId == product.ProductId))
            {
                return NotFound();
            }
            throw;
        }
    }

    // POST api/Product
    [ResponseType(typeof(Product))]
    public async Task<IHttpActionResult> PostProduct(Product product)
    {
        if (!ModelState.IsValid)
        {
            return BadRequest(ModelState);
        }

        _dbContext.Products.Add(product);
        await _dbContext.SaveChangesAsync();

        var ctx = ((IObjectContextAdapter) _dbContext).ObjectContext;
        ctx.LoadProperty(product, p => p.Category);

        return CreatedAtRoute("DefaultApi", new { id = product.ProductId }, product);
    }

    // DELETE api/Product/5
    public async Task<IHttpActionResult> DeleteProduct(int id)
    {
        Product product = await _dbContext.Products
            .Include(p => p.Category)
            .SingleOrDefaultAsync(p => p.ProductId == id);
        if (product == null)
        {
            return NotFound();
        }

        _dbContext.Products.Attach(product);
        _dbContext.Products.Remove(product);

        try
        {
            await _dbContext.SaveChangesAsync();
            return Ok();
        }
        catch (DbUpdateConcurrencyException)
        {
            if (!_dbContext.Products.Any(p => p.ProductId == product.ProductId))
            {
                return NotFound();
            }
            throw;
        }
    }

    protected override void Dispose(bool disposing)
    {
        if (disposing)
        {
            _dbContext.Dispose();
        }
        base.Dispose(disposing);
    }
}

While Web API integration is a sweet spot of the Trackable Entities Visual Studio extension, I’ve also included support for Windows Communication Foundation. First, entities are decorated with [DataContract(IsReference = true)].  Second, there is an item template called TrackableWcfServiceType, which inserts a WCF service contract interface and implementation for async CRUD operations.  Here is the code generated for the Product service.

[ServiceBehavior(InstanceContextMode = InstanceContextMode.PerCall)]
public class ProductService : IProductService, IDisposable
{
    private readonly NorthwindSlimContext _dbContext;

    public ProductService()
    {
        _dbContext = new NorthwindSlimContext();
    }

    public async Task<IEnumerable<Product>> GetProducts()
    {
        IEnumerable<Product> entities = await _dbContext.Products
            .ToListAsync();
        return entities;
    }

    public async Task<Product> GetProduct(int id)
    {
        Product entity = await _dbContext.Products
            .SingleOrDefaultAsync(x => x.ProductId == id);
        return entity;
    }

    public async Task<Product> UpdateProduct(Product entity)
    {
        try
        {
            // Update object graph entity state
            _dbContext.ApplyChanges(entity);
            await _dbContext.SaveChangesAsync();
            return entity;
        }
        catch (DbUpdateConcurrencyException updateEx)
        {
            throw new FaultException(updateEx.Message);
        }
    }

    public async Task<Product> CreateProduct(Product entity)
    {
        _dbContext.Products.Add(entity);
        await _dbContext.SaveChangesAsync();
        return entity;
    }

public async Task<bool> DeleteProduct(int id)
    {
        Product entity = await _dbContext.Products
            .SingleOrDefaultAsync(x => x.ProductId == id);
        if (entity == null)
            return false;

        try
        {
            _dbContext.Products.Attach(entity);
            _dbContext.Products.Remove(entity);
            await _dbContext.SaveChangesAsync();
            return true;
        }
        catch (DbUpdateConcurrencyException updateEx)
        {
            throw new FaultException(updateEx.Message);
        }
    }

    public void Dispose()
    {
        var dispose = _dbContext as IDisposable;
        if (dispose != null)
        {
            _dbContext.Dispose();
        }
    }
}

The nice thing about native clients, be they traditional desktop applications or handheld devices, is that they deal with data in a disconnected fashion, making batch updates a necessity.  That means it would be up to you to figure out which entities are inserted, updated or deleted, then send them separately to the service for persistence.  Trackable Entities gives you client-side change-tracking and an elegant model for server-side persistence, without the extra baggage of a framework like OData.  Plus you get a very nice set of templates for generating server-side persistence code.  Enjoy.

Posted in Technical | Tagged , , , | 15 Comments

Trackable Entities: N-Tier Support for Entity Framework

tracking-logo

Writing N-Tier apps can get complicated fast.  Consider the assortment of n-tier technologies now consigned to the ash heap of history: WCF RIA Services, Self-Tracking Entities, and good old typed DataSets.  These have all suffered from lack of interoperability and tight coupling with technologies that were later deprecated.  DataSets were coupled to the .NET Framework, RIA Services was tightly integrated with Silverlight, and Self-Tracking Entities bit the dust with EF5 when CodeFirst was released and the team didn’t want to upgrade a solution that was somewhat flawed to begin with.

The problem all these approaches attempted to solve is how to commit a batch of entity updates in a single transaction with a single round-trip to the server.  For example, if I have an order with associated details, and I alter the order details by modifying one of the details, removing one, and inserting a new detail, I would like to send the order to a service operation where all the updates can take place atomically.  One approach would be to separate out each set of changes and add them as parameters.  For example: UpdateOrder(Order order, OrderDetail[] addedDetails, OrderDetail[] modifiedDetails, OrderDetail[] deletedDetails).  But that would require me to massage the order by removing all the details and creating different collections of details based on the types of changes, and I would have to cache deleted entities so they could be passed in separately.  That involves a fair amount of tedious work, and the service API becomes rather clunky. It would be preferable for my service to expose an UpdateOrder operation that simply accepts an Order with details that have been added, modified or deleted.

public Order UpdateOrder(Order order)
{
    // Add, update and delete order details ...
}

The trick is to pass entity state along, but to do so in a way that is technology and platform agnostic and that does not add much overhead to the operation.  There is a technology that achieves this goal: OData, implemented by WCF Data Services and OData for ASP.NET Web API.  But the intent of OData and Data Services is to expose an Data Model (EF or an alternative source) as a REST-based service and is geared toward rendering data as a syndication feed.  While this is certainly a plausible choice, it might be overkill for scenarios where you simple want to expose a set of fine-grained operations.

A simpler and more straightforward approach would be to attach a little bit of metadata to each entity to indicate its state.  Then read that state on the server-side, performing all the updates in a single transaction.  That is the purpose of my new library and Visual Studio 2012 extension: Trackable Entities.

new-trackable-project

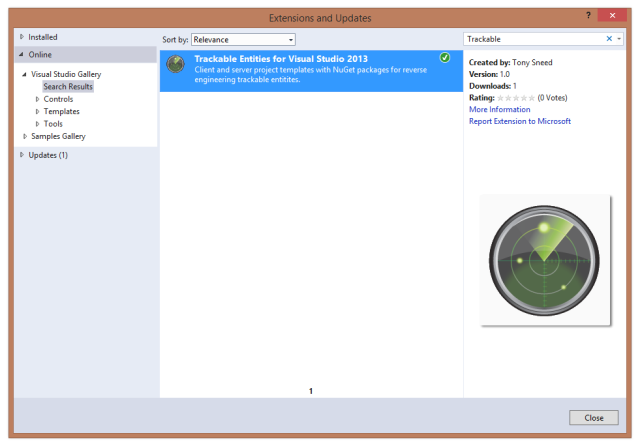
The easiest way to get it is to install it from within Visual Studio: Tools, Extensions and Updates, Online Visual Studio Gallery, then search for “Trackable”.  But you can get more goodness by visiting the Trackable Entities CodePlex site where you can download samples and source code. (Note that a prerequisite for the VS extension is the Entity Framework Power Tools.)

trackable-vs-gallery

Core functionality is contained in a set of TrackableEntities NuGet packages, which provide both client-side change-tracking and a server-side DbContext extension which can walk an object graph and inform the DbContext of each entity’s state so it can be persisted in a transaction when SaveChanges is called.  The client Nuget package has a ChangeTrackingCollection<T>, which extends ObservableCollection<T> by monitoring entity changes and marking them as Added, Modified or Deleted.  There is a GetChanges that returns a cloned object graph containing only changed entities.  The client-side package is implemented as a Portable Class Library which supports .NET 4.5, Silverlight 4-5, Windows Phone 7-5 or greater, and Windows Store applications.

Entity state is tracked by means of the ITrackable interface:

public interface ITrackable
{
    TrackingState TrackingState { get; set; }
    ICollection<string> ModifiedProperties { get; set; }
}

TrackingState is simply an enum, and ModifiedProperties contains a list of properties that have been updated on an entity, so that only changed properties can be persisted.

public enum TrackingState
{
    Unchanged,
    Added,
    Modified,
    Deleted
}

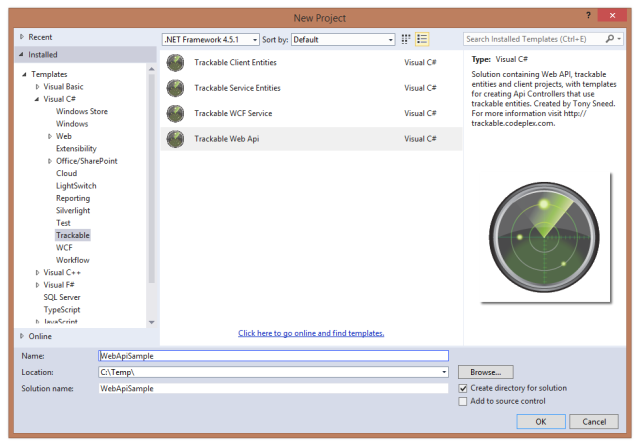
While the NuGet packages provide change-tracking and persistence capability, the sweet spot for productively using these libraries lies in the Trackable Entities Visual Studio 2012 extension, deployed as a VSIX file that installs a number of Visual Studio project templates.  First there is a Client Entities template, which creates a portable library and includes a T4 template for reverse engineering client entities using Entity Framework Power Tools.  Keep in mind that on the client you will remove all EF-specific classes and packages after running the tool, and there will be no coupling to EF on the client, or any other persistence technology for that matter.  (I have submitted a feature request to the EF team for allowing the EF Power Tools to generate entities separately from EF-specific classes, so they can be placed in an assembly that does not reference EF.)  Each generated entity implements both ITrackable and INotifyPropertyChanged interfaces to facilitate change-tracking, and child collections are typed as ChangeTrackingCollection<T>, so that they are properly change-tracked. For example, here is the Order entity reverse engineered from the Northwind database.

[JsonObject(IsReference = true)]
[DataContract(IsReference = true, Namespace = "http://schemas.datacontract.org/2004/07/TrackableEntities.Models")]
public partial class Order : ModelBase<Order>
{
    [DataMember]
    public int OrderId
    { 
        get { return _OrderId; }
        set
        {
            if (value == _OrderId) return;
            _OrderId = value;
            NotifyPropertyChanged(m => m.OrderId);
        }
    }
    private int _OrderId;

    [DataMember]
    public string CustomerId
    { 
        get { return _CustomerId; }
        set
        {
            if (value == _CustomerId) return;
            _CustomerId = value;
            NotifyPropertyChanged(m => m.CustomerId);
        }
    }
    private string _CustomerId;

    [DataMember]
    public Customer Customer
    {
        get { return _Customer; }
        set
        {
            if (value == _Customer) return;
            _Customer = value;
            NotifyPropertyChanged(m => m.Customer);
        }
    }
    private Customer _Customer;

    [DataMember]
    public ChangeTrackingCollection<OrderDetail> OrderDetails
    {
        get { return _OrderDetails; }
        set
        {
            if (Equals(value, _OrderDetails)) return;
            _OrderDetails = value;
            NotifyPropertyChanged(m => m.OrderDetails);
        }
    }
    private ChangeTrackingCollection<OrderDetail> _OrderDetails;
}

ITrackable and INotifyPropertyChanged interfaces are implemented in ModelBase<T>, which has a property NotifyPropertyChanged method that accepts lambda expressions.  You might also notice the use of [DataContract] and [JsonObject] attributes, which support serialization of cyclical references with an IsReference property when it is set to True.

On the server side you can use the Service Entities project template to create a .NET 4.5 class library. It also has a set of T4 templates for use with the EF Power Tools that reverse engineer CodeFirst classes and entities that implement ITrackable.  It comes with an ApplyChanges extension method to DbContext which walks an entity object graph, reads the tracking state and sets the entity state.  It can be tricky to apply state changes in the right order as you recursively traverse an object graph, but the extension method takes care of that for you so you don’t have to worry about it.  All you do is call ApplyChanges just before SaveChanges, and you’re good to go.

var db = new NorthwindContext();
db.ApplyChanges(order);
db.SaveChanges();

The Client and Service Entities project templates give you an amazing amount of functionality, but there’s more!  The Trackable Entities extension also installs a Trackable Web Api multi-project template, which includes both the Client and Service Entities projects, as well as an ASP.NET Web API project with a T4 template that customizes code generation when you add a controller.  The call to ApplyChanges is inserted in the right place, and there are other improvements to the default template.  For example, the Put method returns the updated entity so that concurrency checks will take place, Post loads related entities, and Delete loads child entities.

add-controller

The Web API template also includes a console client project that references the Client Entities project and uses HttpClient to invoke service operation on change-tracked entities.  It includes a ReadMe file with step-by-step instructions to get you started.  Here are some helper methods produced for the console client, which can be ported to any kind of .NET client (for example, WPF, Phone, or Windows Store app).

// TODO: Replace 'Entities', 'Entity', 'EntityId, 'entity' with class name (for ex, Order)

private static Entity GetEntity(HttpClient client, int entityId)
{
    string request = "api/Entities/" + entityId;
    var response = client.GetAsync(request).Result;
    response.EnsureSuccessStatusCode();
    var result = response.Content.ReadAsAsync<Entity>().Result;
    return result;
}

private static Entity CreateEntity(HttpClient client, Entity entity)
{
    string request = "api/Entities";
    var response = client.PostAsJsonAsync(request, entity).Result;
    response.EnsureSuccessStatusCode();
    var result = response.Content.ReadAsAsync<Entity>().Result;
    return result;
}

private static Entity UpdateEntity(HttpClient client, Entity entity)
{
    string request = "api/Entities";
    var response = client.PutAsJsonAsync(request, entity).Result;
    response.EnsureSuccessStatusCode();
    var result = response.Content.ReadAsAsync<Entity>().Result;
    return result;
}

private static void DeleteEntity(HttpClient client, Entity entity)
{
    string request = "api/Entities/" + entity.EntityId;
    var response = client.DeleteAsync(request);
    response.Result.EnsureSuccessStatusCode();
}

I began thinking about trackable entities way back in 2008, when I published an MSDN Magazine article exploring the topic, and then again in 2010 when I updated the code and incorporated T4 templates which read WCF service metadata.  These ideas are carried forward with this project, but it is not tied to WCF and allows for any service or persistence framework (it could, for example, be extended for NHibernate and other object-relational mappers).  The main design goal is to provide a robust client-side change tracker and code-generation of persistence-ignorant classes (POCO) that carry state information with minimal overhead and are fully interoperable.  Service entities are generated independently so they can be mapped to a data context, and they can implement ITrackable without referencing the client library.

The code is fairly stable and there is good code coverage with unit and integration tests, but I’ve released the NuGet packages and VS extension as beta (you need to include Prerelease packages to find it) so that you can start playing with it, and I can respond to feature requests before going RTM.  (Note that the EF Power Tools are also in Beta but will be folded into EF6 when it is released.)  So please let me know what you think and I’ll do my best to address any issues that come up.  Enjoy!

Posted in Technical | Tagged , , , | 18 Comments

More Fun with Async ASP.NET Web API Services

My last post made the case for building async services in .NET 4.5 with the Task-based Asynchronous Pattern, or TAP for short. I profiled an ASP.NET Web API service that uses synchronous methods, showing how long-running services with high throughput result in the production of extra threads and the associated overhead carried by all those threads – both in terms of memory (1 MB stack space per thread) and CPU utilization (context switching). However, thanks to Tasks and their support in the C# programming language with the async and await keywords (also included with VB.NET), building asynchronous services with the ASP.NET Web API is straightforward and relatively painless.

Download the code for this post here.

The idea is to avoid blocking the service thread when performing IO-bound asynchronous operations, such as accessing the network, file system, or a database.  In these and similar scenarios, a a dedicated thread is not required while the device performs its work.  Luckily, many API’s have been updated to include Task-based methods, making it easy to await them from within an async service operation.  This includes Entity Framework 6 (available at the time of this writing as a pre-release NuGet package), HttpClient (for calling other HTTP-based services), and WCF 4.5 (for SOAP-based services).

Adapting EAP Methods

I also described how you can use Task.Factory.FromAsync to convert legacy Begin/End methods from the APM pattern to a Task you can await on.  In addition, TAP provides a class called TaskCompletionSource, which lets you take any API and wrap it in a Task and affect its status (Cancelled, Faulted, or RanToCompletion, etc).  Here you can adapt non-async operations, such as reading from a queue or responding to Timer ticks, to simulate IO-bound Task-based operations. Here is an example of using TaskCompletionSource to adapt the Event Async Pattern to a Task by setting the task state in the event handler for a WebClient.

public async Task<string> WebServiceEventAsync(int id)
{
    // Wire up event handler to task completion source
    var address = string.Format("{0}{1}", WebServiceAddress, id);
    var client = new WebClient {BaseAddress = address};
    var tcs = new TaskCompletionSource<string>();
    client.DownloadStringCompleted += (s, e) =>
        {
            if (e.Cancelled) tcs.TrySetCanceled();
            else if (e.Error != null)tcs.TrySetException(e.Error);
            else tcs.TrySetResult(e.Result);
        };

    // Run async method and await tcs's task
    client.DownloadStringTaskAsync(address).NoWarning();
    string json = await tcs.Task;
    var result = JsonConvert.DeserializeObject<string>(json);
    return result;
}

NoWarning is an extension method you can use to suppress the compiler warning for calling an awaitable method without awaiting on it.

public static class TaskExtensions
{
    // Silences compiler warning
    public static void NoWarning(this Task task) { }
}

Help Page and Test Client

It’s easy to test ASP.NET Web API operations without creating a manual test client.  First, make sure to install the ASP.NET and Web Tools 2012.2 Update, so that you get the Web API help page.

helppage

Then, add the WebApiTestClient NuGet package to your project, and add the following lines to Areas/HelpPage/Views/Help/Api.cshtml:

@Html.DisplayForModel("TestClientDialogs")
@section Scripts {
<link type="text/css" href="~/Areas/HelpPage/HelpPage.css" rel="stylesheet" />
    @Html.DisplayForModel("TestClientReferences")
}

Select an operation, then click Test API, enter parameter values and/or a body, and click Send.

testapi

The response will appear in a friendly box.

eventasync

Multiple Downstream Services

Now that we’ve looked at adapting APM methods to TAP with TaskCompletionSource, let’s have a little more fun with a service that calls multiple downstream services.  You might, for example, want to call two or more other services sequentially from within your async Web API service.  Because await obviates the need for continuation or callback methods, it’s simply a matter of awaiting the first service call, then immediately awaiting the second service call.

public async Task<string> SequentialServicesAsync(int id)
{
    // Start tasks sequentially
    int id1 = id;
    int id2 = id1 + 1;
    var results = new string[2];
    results[0] = await WebServiceAsync(id1);
    results[1] = await SoapServiceAsync(id2);
    var result = string.Join(" ", results);
    return result;
}

The C# compiler magically transforms the code after the first await into a non-blocking continuation.  The same thing is done with code following subsequent awaits, all without nested lambdas.

This pattern is useful for scenarios where you might predicate the second service operation on results from the first, in which case you wouldn’t want to begin the second operation until the first has completed.  There are cases, however, when you would instead want to call multiple downstream operations in parallel.  Your friends here are the combinator methods, Task.WhenAll and Task.WhenAny.  Use Task.WhenAll when you want to process the results after all the operations have completed; use Task.WhenAny when you want to process each operation as it completes.  Here is an example of the latter.

public async Task<string> ParallelServicesAsync(int id)
{
    // Start tasks in parallel (with delay)
    int id1 = id;
    int id2 = id1 + 1;
    var task1 = SoapServiceAsync(id2);
    await Task.Delay(TimeSpan.FromSeconds(3));
    var task2 = WebServiceAsync(id1);

    // Harvest results as they arrive (in lieu of Task.WhenAll)
    var results = new List<string>();
    var tasks = new List<Task<string>> { task1, task2 };
    while (tasks.Count > 0)
    {
        Task<string> task = await Task.WhenAny(tasks);
        tasks.Remove(task);
        string r = await task;
        Debug.Print("Response received: {0}", r); // process
        results.Add(r);
    }
    var result = string.Join(" ", results);
    return result;
}

First, we start each task, with a slight delay to offset execution. Then we iteration over the list of tasks, calling Task.WhenAny to get the first task that has completed, so we can remove it from the list and process the result.

Lastly, we’ll look at a scenario where we want to retry an individual operation a specific number of times, aborting only when the maximum number of retries has been met.

public async Task<string> RetryServiceAsync(int id)
{
    // Create http client that has a timeout
    var client = new HttpClient
    {
        BaseAddress = new Uri(WebServiceAddress),
        Timeout = TimeSpan.FromSeconds(3)
    };

    string result = null;
    const int maxRetries = 3;
    for (int i = 0; i < maxRetries; i++)
    {
        try
        {
            // Succeed only on last attempt
            if (i == maxRetries - 1)
                client = new HttpClient { BaseAddress = new Uri(WebServiceAddress),
                    Timeout = TimeSpan.FromSeconds(6) };
            string json = await client.GetStringAsync(id.ToString());
            result = JsonConvert.DeserializeObject<string>(json);
            break;
        }
        catch (Exception ex)
        {
            Debug.Print("Attempt {0} Error: {1}", i + 1, ex.Message); // log
            if (i == maxRetries - 1)
                throw new Exception(string.Format("Max retries of {0} exceeded", maxRetries));
        }
    }
    return result;
}

Here we see how much easier async exception handling is made with the await keyword, because the exception is handled in the continuation that takes place after the await.  In this example, we create an HttpClient with a 3 second timeout.  Because the service operation is coded to take at least 5 seconds (not shown here), the call to client.GetStringAsync will fail with an OperationCancelledException, in which case we simply log the error and continue the retry loop, or throw an exception if we’ve exceeded the max retries.  We can avoid that by increasing the timeout to 6 seconds for the last iteration – we can also comment out that code to see the retry max exceeded.

The important thing to note about each of these examples is that we are not blocking the service thread when calling multiple IO-bound async operations. When we await an async service operation, the remainder of the method is re-written by the compiler as a callback, which in this case will execute on a Thread Pool thread. But during the time in which the downstream service operation is executing, our service thread will quickly exit, so that it can be used for another incoming service request. That is an essential ingredient for scalable services that can handle high-latency IO with high levels of throughput while creating the minimum number of threads needed to service each request.

Posted in Technical | Tagged , , , | 1 Comment

Build Async Services with ASP.NET Web API and Entity Framework 6

If you are building web services that interact with a database, chances are they are not written in a scalable fashion.  Web services based either on WCF, which supports both SOAP and REST, or on ASP.NET Web API, which exclusively supports REST, use the .NET Thread Pool to respond to requests.  But just because services are inherently multithreaded does not make them scale when numerous requests are made simultaneously.  The very reason why threads are pooled, instead of created on the fly, is because they are an extremely expensive resource, both in terms of memory and CPU utilization.  For example, each thread consumes about 1 MB of stack space, in addition to the register set context and thread properties.

Download the code for this post here. (Updated with code from this post.)

So once a thread has finished its work, it stays alive for about a minute, in the off-chance another request will arrive and the waiting thread can be used to service it.  This means that if during the time a service request is being executed, another request arrives, an additional thread will be retrieved from the Thread Pool to service the second request.  If there are no available threads, one will be created from scratch, which can take up to 500 milliseconds, during which time the request will block.  If you have numerous requests for operations that take a long time to complete, more and more threads will be created, consuming additional memory and negatively affecting your service’s performance.

The moral of the story is: do not block the executing thread from within a service operation.

Yet, this is precisely what happens when you perform an IO-bound task, such as when you retrieve or save data from a database, or invoke a downstream service. Here is an example of one such operation.

public class ProductsController : ApiController
{
    public IEnumerable<Product> Get()
    {
        using (var ctx = new NorthwindSlimContext())
        {
            List<Product> products =
                (from p in ctx.Products.Include("Category")
                    orderby p.ProductName
                    select p).ToList();
            return products;
        }
    }
}

If the call to the database were to take a few seconds or more, and another call comes in (even for another method) an additional thread would need to be procured from the Thread Pool. If there are no available threads, then one would have to be created.  To get a rough picture of this phenomenon, I opened up the Windows Performance Monitor (Run, perfmon), and added a counter from the .NET CLR LocksAndThreads category, which shows the number of current physical threads for the ASP.NET Development Web Server, WebDev.WebServer.40 (aka Cassini).

curr-threads

Running a client that issues a request every 100 milliseconds, I found that the number of current threads for the web server process increased to an average of about 55.

blocking

Thanks to support for asynchronous programming in .NET 4.5 and C# 5, it is extremely easy to write asynchronous methods for an ASP.NET Web API service.  Simply set the return type either to Task (if the synchronous version returns void) or to Task<T>, replacing T with the return type of the synchronous method.  Then from within the method, execute a non-blocking IO-bound async operation.  Marking the method as async  allows you to await an asynchronous operation, with the compiler converting the remainder of the methods into a continuation, or callback, that executes on another thread, usually taken from the Thread Pool.

public async Task<IEnumerable<Product>> Get()
{
    using (var ctx = new NorthwindSlimContext())
    {
        List<Product> products = await
            (from p in ctx.Products.Include("Category")
                orderby p.ProductName
                select p).ToListAsync();
        return products;
    }
}

What makes this code possible is async supported added to Entity Framework 6, available at the time of this writing as a Prerelease NuGet package.  In addition to the ToListAsync method, there are async versions of SingleOrDefault and other query methods, as well as SaveChanges – as described in the EF6 Async Spec.  What is important to emphasize here is that the async call to the database is IO-bound versus compute-bound.  In other words, the currently executing thread is returned immediately to the thread pool and becomes available to service other incoming requests.

When I profiled the async version of the service operation, the number of current threads hovered at around 16 — a tremendous improvement over the synchronous version!

non-blocking

Besides database operations, another candidate for async IO would be calling downstream web services.  HttpClient, which comes with ASP.NET Web API, already has a task-based API for http requests, which makes it super easy to use from within an async service operation.

public async Task<string> WebServiceAsync(int id)
{
    var client = new HttpClient { BaseAddress = 
        new Uri(WebServiceAddress) };
    string json = await client.GetStringAsync(id.ToString());
    var result = JsonConvert.DeserializeObject<string>(json);
    return result;
}

If you are using an older web client, such as WebRequest, which has Begin and End methods, Task.Factory has a FromAsync method to help you convert it to a task-based model.

public async Task<string> WebServiceFromAsync(int id)
{
    var address = string.Format("{0}{1}", WebServiceAddress, id);
    var webRequest = WebRequest.Create(address);
    var webResponse = await Task<WebResponse>.Factory.FromAsync
        (webRequest.BeginGetResponse(null, null), 
         webRequest.EndGetResponse);
    using (var reader = new StreamReader
        (webResponse.GetResponseStream()))
    {
        string json = reader.ReadToEnd();
        var result = JsonConvert.DeserializeObject<string>(json);
        return result;
    }
}

If you are calling a SOAP service, WCF 4.5 has added support for async task-based service operations.

    [ServiceContract(Namespace = "urn:examples:services")]
    public interface IValuesService
    {
        [OperationContract(Action = "GetValue", 
            ReplyAction = "GetValueResponse")]
        Task<string> GetValue(int id);
    }

The code creating a client channel looks the same, but we can now await the call to GetValue, which frees up the currently executing thread for the async service operation.

public async Task<string> SoapServiceAsync(int id)
{
    var factory = new ChannelFactory<IValuesService>
        (new BasicHttpBinding());
    var address = new EndpointAddress(SoapServiceAddress);
    var client = factory.CreateChannel(address);
    using ((IDisposable)client)
    {
        string result = await client.GetValue(id);
        return result;
    }
}

The addition of async support for EF6 is a quantum leap forward for developers striving to write scalable services that need to perform data access. Task-based asynchrony with C# language support have been woven into both WCF and ASP.NET Web API, simplifying the effort it takes to compose asynchronous service operations.  Enjoy.

Posted in Technical | Tagged , , , | 6 Comments

Writing Portable Code

With so many different incarnations of the .NET Framework, targeting multiple versions and profiles can get tricky.  Ideally, it should be possible to share a common set of code across multiple platforms without the need to create multiple projects, each targeted to a different version.  Until now you had you alternatives: (1) store common code in a lower version assembly and reference it from higher version assemblies, or (2) use linked files between assemblies.

With my Simple MVVM Toolkit, I took the second approach, placing common code in a source project, and then linking to those files from platform-specific projects, such as Silverlight, WPF or Windows Phone. To accomplish this, I simply added an existing item to the target project, but instead of clicking the Add button, I selected the Add As Link button.

add-shared-link.jpg

Although the physical class file resides in the source project, it is pulled into the assembly of the target project when it is built, compliments of an MSBuild task.  You can even insert preprocessor directives in the source file to include code that is platform-specific.

public class DotNetClass
{
    public string GetInfo()
    {
        #if SILVERLIGHT
            return "I am a Silverlight class.";
        #else
            return "I am a .NET class.";
        #endif
    }
}

While this approach gets the job done, it has its drawbacks, the main one being that a different project for each target platform must be created, which can proliferate to include numerous profiles, for example, the .NET client profile, Silverlight and Windows Phone. It would be nice if you only had to maintain a single project that could be referenced by a number of different targets, as well as flavors of .NET that are new on the scene, such as Windows 8 and Windows RT, or ones that haven’t even emerged yet.  To address this challenge, Microsoft released the Portable Class Library project type for Visual Studio 2012 (there is a separate download for Visual Studio 2010).

Feature .NET Framework Windows Store Silverlight Windows Phone
Core
LINQ
IQueryable Only 7.5
Dynamic Only 4.5  
MEF  
Network
Serialization
WCF
MVVM Only 4.5
Data Annotations Only 4.0.3, 4.5  
LINQ to XML Only 4.0.3, 4.5
Numerics  

This table represents which features are supported for each target platform.  XBox 360 can also be targeted, but then you’re limited to Core and LINQ to XML only.  When adding a portable class library project, you select which flavors of .NET you would like to support and consequently which features of .NET can be used in your common code, but you can always change this later via the Library tab of the project properties page.  The resulting DLL can be referenced by any of the selected target frameworks.

add-pcl

Jeremy Likness has a three-part series on how a portable class library uses type forwarders so that the correct type is surfaced to the target platform when an assembly references a portable library.  Check it out to see how things work under the covers.

Once you’ve decided to convert your common code to a portable class library, you need a way to wire up code that is platform-specific.  With linked files all you have to do is include necessary preprocessor directives, but that won’t work if you’re using PCL’s.  This was a significant roadblock when it came to refactoring my MVVM toolkit to use a portable library.  The ViewModelBase class uses a Dispatcher from System.Windows.Threading, which is set to either Dispatcher.CurrentDispatcher for WPF or Deployment.Current.Dispatcher for Silverlight.  The main problem is that the base Dispatcher class is not included in the available portable API’s.

At first I considered programming against SynchronizationContext to handle situations where a call starts on a non-UI thread and needs to be marshaled onto the UI thread.  But the API is different and would have introduced breaking changes into the code base.  So instead I opted for an IDispatcher interface to abstract away the Windows Dispatcher in WPF and Silverlight.  It contains two methods: CheckAccess and BeginInvoke.

public interface IDispatcher
{
    bool CheckAccess();
    void BeginInvoke(Action action);
}

Then in a ViewModelBaseCore abstract base class I inserted a protected constructor accepting an IDispatcher argument, and I added the class to the shared PCL project.

public abstract class ViewModelBaseCore<TViewModel> : INotifyPropertyChanged
{
    protected readonly IDispatcher Dispatcher;

    protected ViewModelBaseCore(IDispatcher dispatcher)
    {
        Dispatcher = dispatcher;
    }
}

In the target-specific project, I invoked the protected ctor, passing in the implementation of IDispatcher corresponding to the target platform (Silverlight or WPF).

public abstract class ViewModelBase<TViewModel> : ViewModelBaseCore<TViewModel>, INotifyDataErrorInfo
{
    protected ViewModelBase()
        : base(UIDispatcher.Current)
    {
    }
}

UIDispatcher is basically a singleton, with a Current property that returns the appropriate implementation using good old fashioned linked files and preprocessor directives.

public static IDispatcher Current
{
    get
    {
        #if SILVERLIGHT
            WindowsDispatcher windowsDispatcher = Deployment.Current.Dispatcher;
        #else
            WindowsDispatcher windowsDispatcher = WindowsDispatcher.CurrentDispatcher;
        #endif
        _dispatcher = new UIDispatcher(windowsDispatcher);
        return _dispatcher;
    }
}

One way to distribute portable code is via the NuGet Package Manager that comes pre-installed as an extension in Visual Studio 2012.  There is special support built into NuGet for portable class libraries.  A visual tool is available for building packages, but in the past I’ve always used the command-line tool.  Basically, you have to create a lib folder, then within that folder, you create subfolders for each target platform, for example, net45, sl5, wp71, windows8.  But as of NuGet version 2.1, you can instead create a portable class library and place it in a folder name starting with portable- and followed by a list of platforms, delimited by the + sign.  For example: portable-net45+sl5+wp71+windows8.  This works wonderfully, and it enables you to place binaries in just this one folder, instead of having separate folders for each target platform.

However, if you have both a portable library and a platform-specific library (as is the case with v4 of my Simple MVVM Toolkit), then NuGet will ignore the portable folder and just use the platform-specific folder, so you’re better off just having the platform subfolders, each containing both the portable library and the platform-specific library.

In summary, the Portable Class Library tools are a great way to share code across multiple versions and profiles of the .NET Framework, but you’re limited to code that will run across all the target platforms you specified for your portable library.  So if you want to include functionality that differs from one platform to the next, such as UI cross-threading capability, you’ll also need to build platform-specific assemblies which can reference the common assembly.  Deploying portable code is made easier by NuGet, which has built-in support for portable class libraries.

Posted in Technical | Tagged | 3 Comments

Building Scalable and Secure WCF Services

The key to building scalable WCF services is to eliminate binding configurations that could result in server affinity.  For this reason you should avoid bindings that establish a session with the service, such as NetTcpBinding or WsHttpBinding with secure conversation enabled.  Both BasicHttpBinding and WebHttpBinding, however, are sessionless and allow you to call a service multiple times without concern for which physical server responds to the call.  This means the load can be more efficiently distributed across multiple servers.

Download the code for this blog post here.

Nevertheless, there is one wrinkle: by default the WCF HTTP bindings enable Keep-Alive, which can result in server affinity and thereby impede scalability in a load-balanced environment.  Here is a snapshot of 5 calls to a service with HTTP Keep-Alive enabled over SSL.  Notice the tunneling only takes place once because a consistent connection is maintained with the server.  This is fine and dandy when clients are talking to the same back-end server and the SSL handshake only takes place when the connection is established.

fiddler-keep-alive-true

Here is a snapshot of the same five calls but with Keep-Alive disabled. Notice how the handshake takes place each time the service is called.

fiddler-keep-alive-false

To disable Keep-Alive, you need to create a custom binding, because this setting cannot be configured for the standard HTTP bindings.  Here is a web.config file with custom SOAP and REST bindings and Keep-Alive disabled.

<configuration>

  <system.serviceModel>
    
    <services>
      <service name="SecureTransportDemo.Service.GreetingService">
        <endpoint address="Soap"
                  binding="customBinding" 
                  bindingConfiguration="soap-secure-nokeepalive"
                  contract="SecureTransportDemo.Service.IGreetingService"
                  name="soap-nokeepalive"/>
        <endpoint address="Rest"
                  binding="customBinding"
                  bindingConfiguration="rest-secure-nokeepalive"
                  behaviorConfiguration="web"
                  contract="SecureTransportDemo.Service.IGreetingService"
                  name="rest-nokeepalive"/>
      </service>
    </services>
    <bindings>
      <customBinding>
        <binding name="soap-secure-nokeepalive">
          <textMessageEncoding />
          <httpsTransport allowCookies="false" 
                          keepAliveEnabled="false"/>
        </binding>
        <binding name="rest-secure-nokeepalive">
          <webMessageEncoding />
          <httpsTransport manualAddressing="true" 
                          allowCookies="false" 
                          keepAliveEnabled="false"/>
        </binding>
      </customBinding>
    </bindings>
    <behaviors>
      <endpointBehaviors>
        <behavior name="web">
          <webHttp automaticFormatSelectionEnabled="true"
                   faultExceptionEnabled="true"
                   helpEnabled="true"/>
        </behavior>
      </endpointBehaviors>
    </behaviors>
  </system.serviceModel>

</configuration>

There’s a problem however – we’re still not getting optimal efficiency for a load-balanced environment.  The ideal solution would be a load balancer in the DMZ that would accept requests from clients over SSL with Keep-Alive enabled, but would turn around and communicate with backend servers over a non-secure channel with Keep-Alive disabled.  For that we need a load balancer capable of SSL pass-through, such as F5’s BIG-IP. (Note that you’ll still want to secure the communication between the load balancer and the service using a mechanism such as IPSec, so that privacy is also maintained inside the corporate firewall.)

ssl-pass-thru

The problem here is that WCF will not allow you to pass credentials, such as username and password, over a non-secure channel. And for good reason: credentials sent in the clear could be intercepted. However, presuming it is safe to send credentials from the load balancer to the backend service from behind a firewall, this is exactly what we want to do.  The trick is to fool WCF into thinking we are using a secure channel when in fact we are not.

Michele Leroux Bustamante has written an excellent article showing precisely how to do this.  It entails creating a custom HttpTransportBindingElement that can assert security capabilities indicating encryption and signing at the transport level when in fact this is not the case.  Essentially the custom binding element has a GetProperty method which returns an implementation of ISecurityCapabilities asserting that a protection level of EncryptAndSign is supported.

public class NonSslAuthHttpTransportBindingElement : HttpTransportBindingElement
{
    public override BindingElement Clone()
    {
        return new NonSslAuthHttpTransportBindingElement
            {
                AuthenticationScheme = AuthenticationScheme,
                ManualAddressing = ManualAddressing
            };
    }

    public override T GetProperty<T>(BindingContext context)
    {
        if (typeof(T) == typeof(ISecurityCapabilities))
        {
            return (T)(object)new NonSslAuthSecurityCapabilities();
        }
        return base.GetProperty<T>(context);
    }
}
public class NonSslAuthSecurityCapabilities : ISecurityCapabilities
{
    public ProtectionLevel SupportedRequestProtectionLevel
    {
        get { return ProtectionLevel.EncryptAndSign; }
    }

    public ProtectionLevel SupportedResponseProtectionLevel
    {
        get { return ProtectionLevel.EncryptAndSign; }
    }

    public bool SupportsClientAuthentication
    {
        get { return false; }
    }

    public bool SupportsClientWindowsIdentity
    {
        get { return false; }
    }

    public bool SupportsServerAuthentication
    {
        get { return true; }
    }
}

The next step would be to create a class extending HttpTransportElement, so that you can specify the transport element for the custom binding in the config file of the service host.

public class NonSslAuthTransportElement : HttpTransportElement
{
    public override Type BindingElementType
    {
        get { return typeof(NonSslAuthHttpTransportBindingElement); }
    }

    protected override TransportBindingElement CreateDefaultBindingElement()
    {
        return new NonSslAuthHttpTransportBindingElement();
    }
}

For this you’ll need to define a binding element extension in the config file that transport element type.  Here is what the service config file looks like with the extension defined and used in a custom binding.

<extensions>
  <bindingElementExtensions>
    <add name="nonSslAuthTransport"
          type="NonSslAuthSecurity.NonSslAuthTransportElement, NonSslAuthSecurity"/>
  </bindingElementExtensions>
</extensions>

<bindings>
  <customBinding>
    <binding name="nonSslAuthBinding">
      <binaryMessageEncoding />
      <security authenticationMode="UserNameOverTransport"/>
      <nonSslAuthTransport authenticationScheme="Anonymous"
                            allowCookies="false"
                            keepAliveEnabled="false"/>
    </binding>
    <binding name="webNonSslAuthBinding">
      <webMessageEncoding />
      <nonSslAuthTransport authenticationScheme="Basic"
                            manualAddressing="true"
                            allowCookies="false"
                            keepAliveEnabled="false"/>
    </binding>
  </customBinding>
</bindings>

In this example I’m also specifying binary message encoding for the SOAP endpoint because I’m certain that a .NET client will be calling the service, and this will result in a more compact wire representation of the message. (This is a very good practice in an all-.NET environment, but it is not taken advantage of as often as it should be.)

If you download the code for this post, you’ll see that it contains a FakeLoadBalancer project with a routing service that simulates a load balancer with SSL pass-through capability.  With a real load balancer, you could also get performance benefits from hardware-based acceleration for SSL.  The sample project contains the necessary binding configurations for both SOAP and REST style endpoints. Enjoy.

Posted in Technical | Tagged , , | 30 Comments

Simple WCF SOAP-REST Multi-Project Template

Download the source code for this post.

I did it again: another multi-project Visual Studio template – this time for a simple WCF service that exposes both SOAP and REST endpoints.  My other REST and SOAP templates are intended as a starting point for more real-world WCF services.  However, what I often need is a starting point for building a “proof-of-concept” service in order to explore various configuration options and scenarios.

soap-rest-ext

To get the new template, all you have to do is fire up Visual Studio, then open up the Extensions Manager from under the Tools menu.  Search for “WCF SOAP-REST” in the Online Gallery, then click Download to install the extension.

soap-rest-gallery

Then to use the template, simply select New Project from the File menu, click on the WCF category and select “WCF SOAP and REST Simple Service.” After clicking OK, simply press F5 to start the ASP.NET Development web server (aka Cassini), and press Ctrl+F5 to launch the client and keep the console from closing.

soap-rest-svc-new

There are a couple of things different about this project.  First, you’ll notice only three projects are created: Client, Service and Web. Both the service contract and implementation are located in the Service project.  Second, the service is a simple GreetingService with a method that accepts and returns a simple string.  This is usually sufficient for simple configuration scenarios.  The web host exposes both SOAP and REST style endpoints but does not sport the usual REST bells and whistles, such as integration with the ASP.NET routing module.

Lastly, there is a “useFiddler” flag in the client app.config which, when set, appends a dot to the “localhost” part of the url when calling the service.  This lets you easily launch Fiddler to intercept HTTP traffic to your service.

fiddler

Here is code in the client project that uses SOAP and REST to communicate with the service.  The SOAP client uses a ClientChannel helper class in order to properly clean up the client channel when exiting the “using” block and not throw an extra exception if the channel is faulted.  The REST client uses LINQ to XML to parse the response.

class Program
{
    static void Main(string[] args)
    {
        string soapResponse = UseSoap();
        Console.WriteLine("SOAP: {0}", soapResponse);

        string restResponse = UseRest();
        Console.WriteLine("REST: {0}", restResponse);
    }

    private static string UseSoap()
    {
        var factory = new ChannelFactory<IGreetingService>("soap");
        factory.Endpoint.Address = new EndpointAddress(GetAddress(factory.Endpoint.Address.ToString()));
        using (var client = new ClientChannel<IGreetingService>(factory.CreateChannel()))
        {
            return client.Channel.Hello("Tony");
        }
    }

    private static string UseRest()
    {
        string url = ConfigurationManager.AppSettings["rest"];
        var client = new WebClient { BaseAddress = GetAddress(url) };
        string responseString = client.DownloadString("?name=Tony");
        XElement responseXml = XElement.Parse(responseString);
        return responseXml.Value;
    }

    private static string GetAddress(string address)
    {
        bool useFiddler;
        if (bool.TryParse(ConfigurationManager.AppSettings["useFiddler"], out useFiddler)
            && useFiddler)
        {
            return address.Replace("localhost", "localhost.");
        }
        return address;
    }
}

Hopefully this template will save you some time when all you want to do is put in place a simple WCF SOAP or REST service for testing and exploratory purposes.  Enjoy.

Posted in Technical | Tagged , , , | Leave a comment

WCF SOAP and REST Multi-Project Visual Studio Templates

Download the code for this post.

Last year I published a REST Multi-Project Visual Studio Template on the Visual Studio Extensions Gallery, available for download from the Tools-Manage Extensions menu from within Visual Studio 2010. What I like about this sort of project template is that it produces a much more realistic WCF solution with entities spit off into a separate project that is referenced from both the service and client projects.  Similarly, the service resides in a separate project than the web host, which makes it easier to re-deploy it in a self-hosting scenario (such as a Windows Service).

I’ve been doing quite a bit more WCF work lately and found myself creating the same kind of WCF SOAP projects over and over again.  So I dusted off my blog post on building multi-project Visual Studio templates and set off to build a WCF SOAP Multi-Project Template, which I uploaded the Visual Studio Extensions Gallery.

soap-svc-gallery

To install the WCF Soap Multi-Project Template, simply open Visual Studio, then select Extensions Manager from the Tools menu. Select the Templates category from the Online Gallery, then search for “WCF SOAP”.

soap-svc-ext

Click Download, then install the template. To use the template, select New Project from the File menu, then click on the WCF category, where you should see the “WCF SOAP Service” template.

soap-svc-new

It’s a similar idea as the REST Template, but using SOAP services.  I placed Entities and Services into separate projects than the Web host, but I split out the service interface into its own project so that it could be shared between the service and client projects – I typically use a channel factory in the client and it needs the interface.  In addition there is a Common project with a Namespaces class that has constants that replace magic strings for xml namespaces on the service and data contracts.

soap-svc-sol

The template comes with one other goodie: a ClientChannel class to encapsulate the client proxy and implement IDisposable so that it aborts the communication channel without throwing an exception if it is in a faulted state.

public class ClientChannel<TChannel> : IDisposable
{
    private bool _disposed;

    public ClientChannel(TChannel channel)
    {
        Channel = channel;
    }

    public TChannel Channel { get; private set; }

    void IDisposable.Dispose()
    {
        if (_disposed) return;
        Dispose(false);
        _disposed = true;
    }

    protected virtual void Dispose(bool disposing)
    {
        var channel = Channel as ICommunicationObject;
        if (channel != null)
        {
            try
            {
                if (channel.State != CommunicationState.Closed)
                    channel.Close();
            }
            catch
            {
                channel.Abort();
            }
        }
    }
}

The TChannel type argument is the service contract interface.  Here is how the client uses this class to communicate with the service.

var factory = new ChannelFactory<ISampleService>("soap-basic");
using (var client = new ClientChannel<ISampleService>(factory.CreateChannel()))
{
    var item1 = client.Channel.GetItemById(1);
}

The web host exposes a basic http endpoint using the built-in ASP.NET Development Web Server and a fixed port number, which you can easily change.  Just remember to change the port number in the client endpoint address found in the client’s app.config file. Enjoy.

Posted in Technical | Tagged , , , | Leave a comment