I am pleased to announce the general availability of Event Driven .NET, a platform which .NET developers can use to build microservices based on event-driven architecture, creating distributed systems that can be developed by multiple teams in parallel with services that can be versioned, deployed and scaled independently.
For source code, samples and instructions on how to get started building event-driven microservices, visit the home of Event Driven .NET: https://github.com/event-driven-dotnet/home
This is part of a blog post series on building event-driven microservices with Event Driven .NET:
- Announcing Event Driven .NET – An Event Driven Microservices Platform for .NET (this post)
- Properly Scope Microservices with Domain Driven Design (future post)
- Separate Read and Write Responsibilities with CQRS (future post)
- Decouple Microservices with an Event Bus and Dapr (future post)
- Orchestrate Updates Across Multiple Microservices with Sagas (future post)
- Get Audit Trail and Time Travel for Microservices with Event Sourcing (future post)
- Real-Time Data Processing for Microservices with Event Streams (future post)
The Promise and Peril of Microservices
According to Chris Richardson (owner of microservices.io and author of the book Microservices Patterns), microservices is an architectural style with a collection of services that are:
- Highly maintainable and testable
- Loosely coupled
- Independently deployable
- Organized around business capabilities
- Owned by a small team
The promise of microservices is to enable teams to build large, complex systems with services that can be deployed as independent units so that features can be delivered with greater velocity without deploying the entire application all at once.
While at first glance microservices sound like a terrific idea, building systems in the real world using this pattern has proven elusive for many teams. There are several common pitfalls that can introduce coupling among services, and the solutions to these challenges may not be readily apparent. Here are a few examples of microservice anti-patterns:
- Failing to scope services at the appropriate level of granularity
- Sharing a database among services
- Point-to-point communication between services
Here are some patterns which can be applied to address each of these issues.
- Domain Driven Design
- Command Query Responsibility Segregation
- Event Driven Architecture
Domain Driven Design plays an important role in helping ensure that services are scoped at the optimal level of granularity. If a service is scoped too broadly, multiple teams working on the same service can interfere with one another. Scaling such a service may prove inefficient, and deployments may become larger than they need to be. On the other hand, if a service is too finely scoped, it may complicate deployments and increase maintenance costs. DDD addresses this issue by demarcating bounded contexts and defining aggregate root entities which logically group child entities. Most of the time, the ideal level of granularity is to create one microservice per aggregate root.
Command Query Responsibility Segregation is a pattern that separates read and update operations for a data store. This separation allows different optimizations to be applied to the read and write sides, including use of different database technologies, for example, NoSQL for writes and SQL for reads. In a microservices architecture this allows one service to update its data store by subscribing to events published by other services when updating their respective data stores.
Event Driven Architecture is a pattern that focuses on publishing and consuming events in reaction to changes in state. With microservices, it is quite useful for one service to publish integration events so that another service can update its data store by subscribing to these events. This can help alleviate the need for direct, synchronous service-to-service communication, which requires both services to be available at the same time.
An Event-Driven Microservices Platform
Each of these patterns can have a relatively steep learning curve, and it can be difficult to apply them in a way that achieves the objectives of a distributed system that is robust and flexible. That is why many .NET developers could use a microservices platform.

Event Driven .NET provides an event-driven microservices platform for .NET developers that combines DDD, CQRS and EDA patterns on top of a messaging layer consisting of an Event Bus, Service Mesh capabilities exposed by Distributed Application Runtime (Dapr), a Message Broker (such as Amazon SNS+SQS or Azure Service Bus), and Kubernetes for container orchestration (such as Amazon EKS or Azure AKS). The Event Bus relies on Dapr for pub-sub and has support for idempotency with an event cache that filters out duplicate events. It also uses a schema registry to validate messages for compatibility with registered schemas. Sagas in Event Driven .NET use the Event Bus to orchestrate updates across services so that they all succeed or roll back using compensating actions. The messaging layer allows for fine-tuning various cross-cutting concerns, such as monitoring and observability, security and privacy, rate limiting, feature flags, testing and deployment.
Rather than imposing a prescriptive framework that dictates one way to build microservices, Event Driven .NET provides a set of abstractions and libraries, deployed as NuGet packages, combined with reference architectures which illustrate how to build loosely coupled services, each scoped to an aggregate root and persisted to a private data store. Services have REST handlers with separate command and query controllers that accept Data Transfer Objects mapped to domain entities. Services communicate with one another over an Event Bus that uses Dapr to abstract away the concrete message broker implementation and enable observability with monitoring and tracing. Finally, services are deployed to Kubernetes for container orchestration, fault tolerance and responsive elastic scaling.

In the Reference Architecture for Event Driven .NET, the Customer Service publishes a versioned “address changed” integration event whenever a customer’s address is updated. The Order Service subscribes to this event, which is delivered by the underlying message broker, so that it can update the shipping address of the customer’s orders. This way, the Order Service always has the updated customer address information, which removes the need for the Order Service to communicate directly with the Customer Service. (Note there are drawbacks to every pattern, including this one, and that this diagram depicts a simplified version of CQRS, which is often implemented using separate services / databases for read and write operations.)
A Layered Approach
Event Driven .NET is designed to allow you to wade gradually into the waters of event-driven microservices, so that your system architecture aligns with your organizational structure, as well as the skill set of your developers and the maturity of your DevOps processes.

Starting at the bottom, you can adopt a Domain Driven Design (DDD) approach, then build on this foundation by adding Command Query Responsibility Segregation (CQRS). When you have the need for inter-service communication, you can move to the Event Bus layer, utilizing Dapr as a pub-sub abstraction over a message broker.
If you have the need to maintain eventual data consistency with updates to multiple services spanning a logically atomic operation, you are ready to advance to the next layer: Sagas. When your organization has the need for additional capabilities, such as built-in audit trail and the ability to atomically persist and publish events, you may wish to advance to the Event Sourcing layer (to be implemented). Lastly, if you wish to perform real-time data analysis and transformation, you can consider using Event Streams (to be implemented).
Roadmap
A the time of this writing, Event Driven .NET has impemented the DDD, CQRS, Event Bus and Sagas layers. The following layers are on the roadmap to be completed subsequently.
- Event Sourcing: This will provide the ability to treat domain events as the source of truth for a system, so that services are no longer directly responsible for reversing persistence should event publishing fail. Event sourcing also provides built-in audit trail and replay capabilities.
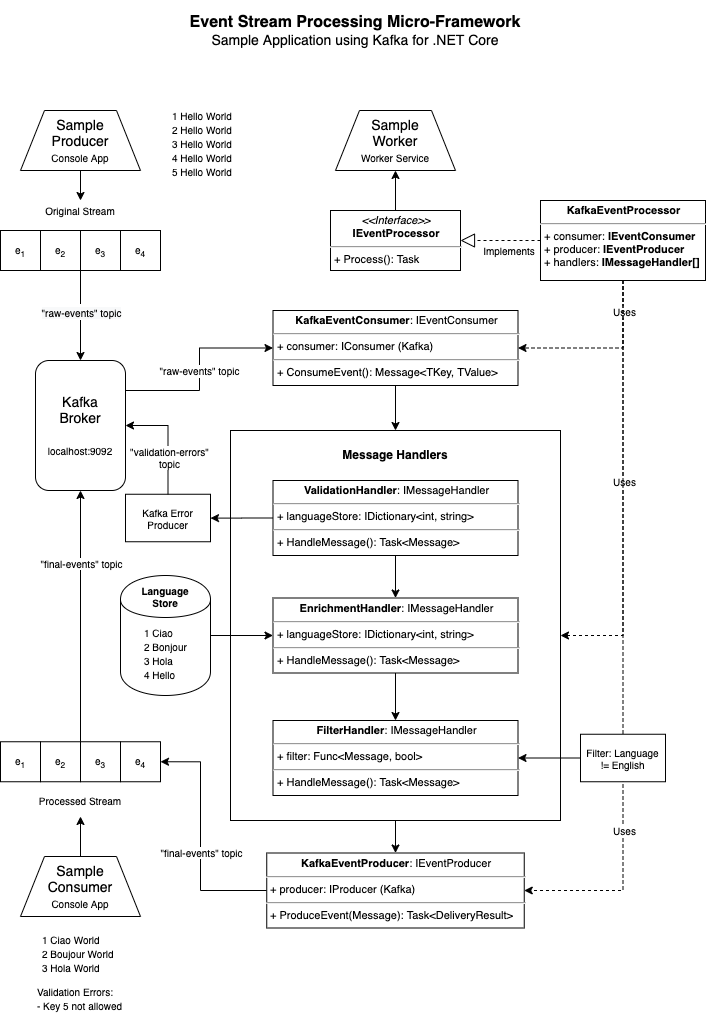
- Event Streams: This will support real-time data analysis and transformation by means of a durable, append-only message broker, such as Apache Kafka or Amazon Kinesis.
Summary
Event Driven .NET provides a platform for building event-driven microservices. Its purpose is to make it easier for .NET developers to build distributed systems which deliver on the promise of microservices for parallel multi-team development, deploying those services at different times, and scaling them independently to meet varying levels of demand in a cost-efficient manner.
Event Driven .NET accomplishes this by providing abstractions, libraries and reference architectures for building microservices that are appropriately scoped within a bounded context and that use events to communicate with one another asynchronously over an event bus abstraction. The event bus leverages Dapr as an application-level service mesh, enabling idempotency and schema validation as it abstracts away the underlying message broker.
Finally, Event Driven .NET builds on the foundation of DDD with layers for CQRS to allow for read-write optimizations, Sagas for modern “distributed transactions” based on eventual consistency, Event Sourcing for audit trail and transactional publishing, and Event Streams for real-time message processing.
To get started with Event Driven.NET, pay a visit to the Reference Architecture repository, where you can follow steps in the Development Guide to build event-drive microservices that are both highly maintainable and scalable.
Now go forth and build microservices with confidence!