
When developing web apps and api’s with ASP.NET Core, it is useful to replicate the kind of setup used to deploy your application to production. While the built-in Kestrel web server is adequate for local development, you need a full-fledged web server, such as IIS, Apache or Nginx, to perform functions such as load balancing and SSL termination. Therefore, it is worthwhile to configure an ASP.NET Core project to run locally using Nginx as a reverse proxy for secure communication over HTTPS. Of course, the best way to do this is by running both the web app and reverse proxy in Docker containers.
You can download the code for this blog post here: https://github.com/tonysneed/Demo.AspNetCore-Nginx-Ssl
Dockerize Web API
To get started you’ll need to install Docker Desktop for Windows or Mac. Then create a Web API project using the .NET Core SDK.
| mkdir HelloAspNetCore3 && cd HelloAspNetCore3 | |
| dotnet new sln --name HelloAspNetCore3 | |
| dotnet new webapi --name HelloAspNetCore3.Api | |
| dotnet sln add HelloAspNetCore3.Api/HelloAspNetCore3.Api.csproj |
Then open the project folder in a code editor of your choice. My favorite is Visual Studio Code, which allows you to easily open a project folder from the command line: code .
Open Startup.cs and edit the Configure method to remove app.UseHttpsRedirection() and add support for using forwarded headers.
| app.UseForwardedHeaders(new ForwardedHeadersOptions | |
| { | |
| ForwardedHeaders = ForwardedHeaders.XForwardedFor | ForwardedHeaders.XForwardedProto | |
| }); |
Next, containerize the Web API project by adding a file named Api.Dockerfile.
| FROM mcr.microsoft.com/dotnet/core/aspnet:3.0-alpine AS base | |
| WORKDIR /app | |
| FROM mcr.microsoft.com/dotnet/core/sdk:3.0-alpine AS build | |
| WORKDIR /src | |
| COPY ["HelloAspNetCore3.Api.csproj", "./"] | |
| RUN dotnet restore "./HelloAspNetCore3.Api.csproj" | |
| COPY . . | |
| WORKDIR "/src/." | |
| RUN dotnet build "HelloAspNetCore3.Api.csproj" -c Release -o /app/build | |
| FROM build AS publish | |
| RUN dotnet publish "HelloAspNetCore3.Api.csproj" -c Release -o /app/publish | |
| FROM base AS final | |
| WORKDIR /app | |
| COPY --from=publish /app/publish . | |
| ENV ASPNETCORE_URLS http://*:5000 | |
| ENTRYPOINT ["dotnet", "HelloAspNetCore3.Api.dll"] |
VS Code has a nice Docker extension that lets you add various kinds of Dockerfiles, including for ASP.NET Core. I modified the default format to use the Alpine Linux distro, which is small and lightweight, and to add an ASPNETCORE_URLS environment variable for serving the Web API on port 5000. Run the following commands to build and run the Docker image.
| docker build -t hello-aspnetcore3 -f Api.Dockerfile . | |
| docker run -d -p 5000:5000 --name hello-aspnetcore3 hello-aspnetcore3 | |
| docker ps |
Use Google Chrome to browse to http://localhost:5000/weatherforecast, and you’ll see some pretty JSON. You can then remove both the container and image.
| docker rm -f hello-aspnetcore3 | |
| docker rmi hello-aspnetcore3 |
Dockerize Nginx Server
Next add an Nginx folder to the solution folder, and place a file there named Nginx.Dockerfile.
| FROM nginx:latest | |
| COPY nginx.conf /etc/nginx/nginx.conf |
You’ll need to create a nginx.conf file that will be copied to the container.
| worker_processes 1; | |
| events { worker_connections 1024; } | |
| http { | |
| sendfile on; | |
| upstream web-api { | |
| server api:5000; | |
| } | |
| server { | |
| listen 80; | |
| server_name $hostname; | |
| location / { | |
| proxy_pass http://web-api; | |
| proxy_redirect off; | |
| proxy_http_version 1.1; | |
| proxy_cache_bypass $http_upgrade; | |
| proxy_set_header Upgrade $http_upgrade; | |
| proxy_set_header Connection keep-alive; | |
| proxy_set_header Host $host; | |
| proxy_set_header X-Real-IP $remote_addr; | |
| proxy_set_header X-Forwarded-For $proxy_add_x_forwarded_for; | |
| proxy_set_header X-Forwarded-Proto $scheme; | |
| proxy_set_header X-Forwarded-Host $server_name; | |
| } | |
| } | |
| } |
Notice that proxy_pass specifies a host name of web-api, which matches the upstream directive with a server value of api:5000, which will be defined later as a service in a docker-compose file.
If you run both the Nginx and Web API containers at the name time, the reverse proxy will return a 502 Bad Gateway, because it will not see the Web API server. Both containers need to be placed in the same network. This can be accomplished using Docker networking directives, or you can simply use docker-compose, which is what we’ll do here. Add a docker-compose.yml file to the solution folder.
| version: "3.7" | |
| services: | |
| reverseproxy: | |
| build: | |
| context: ./Nginx | |
| dockerfile: Nginx.Dockerfile | |
| ports: | |
| - "80:80" | |
| restart: always | |
| api: | |
| depends_on: | |
| - reverseproxy | |
| build: | |
| context: ./HelloAspNetCore3.Api | |
| dockerfile: Api.Dockerfile | |
| expose: | |
| - "5000" | |
| restart: always |
The build directives are there to facilitate building each docker image, which you can perform using the following command: docker-compose build.
To run both containers in a default bridge network, run the following command: docker-compose up -d.
View the running containers with docker ps. Notice that the Web API is not exposed to the host, but the reverse proxy is. Browse to: http://localhost/weatherforecast. To stop the containers run: docker-compose down.
Enable SSL Termination
One of the benefits of using Nginx as a reverse proxy is that you can configure it to use SSL for secure communication with clients, with requests forwarded to the web app over plain HTTP. The first step in this process is to create a public / private key pair for localhost. We can accomplish this task using OpenSSL, which can be installed on both macOS and Windows. Start by adding a localhost.conf file to the Nginx folder.
| [req] | |
| default_bits = 2048 | |
| default_keyfile = localhost.key | |
| distinguished_name = req_distinguished_name | |
| req_extensions = req_ext | |
| x509_extensions = v3_ca | |
| [req_distinguished_name] | |
| countryName = Country Name (2 letter code) | |
| countryName_default = US | |
| stateOrProvinceName = State or Province Name (full name) | |
| stateOrProvinceName_default = Texas | |
| localityName = Locality Name (eg, city) | |
| localityName_default = Dallas | |
| organizationName = Organization Name (eg, company) | |
| organizationName_default = localhost | |
| organizationalUnitName = organizationalunit | |
| organizationalUnitName_default = Development | |
| commonName = Common Name (e.g. server FQDN or YOUR name) | |
| commonName_default = localhost | |
| commonName_max = 64 | |
| [req_ext] | |
| subjectAltName = @alt_names | |
| [v3_ca] | |
| subjectAltName = @alt_names | |
| [alt_names] | |
| DNS.1 = localhost | |
| DNS.2 = 127.0.0.1 |
Run the following command to create localhost.crt and localhost.key files, inserting your own strong password.
| sudo openssl req -x509 -nodes -days 365 -newkey rsa:2048 -keyout localhost.key -out localhost.crt -config localhost.conf -passin pass:YourStrongPassword |
In order to trust the localhost certificate on your local machine, you’ll want to run the following command to create a localhost.pfx file, providing the same strong password when prompted.
| sudo openssl pkcs12 -export -out localhost.pfx -inkey localhost.key -in localhost.crt |
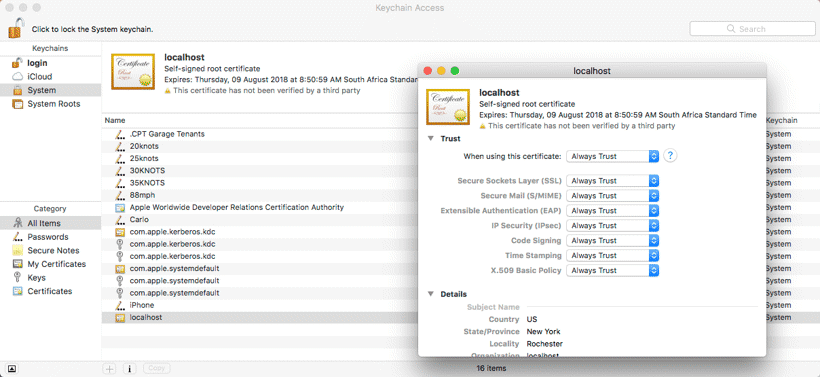
To trust the localhost certificate on macOS, open Keychain Access, select System in the Keychains pane, and drag localhost.pfx from the Finder into the certificate list pane. Then double-click the localhost certificate and under the trust section select Always Trust.
To create and trust a self-signed certificate on Windows, follow these instructions.
Now that you have created a public / private key pair, you need to update Nginx.Dockerfile to copy these files to the container.
| FROM nginx:latest | |
| COPY nginx.conf /etc/nginx/nginx.conf | |
| COPY localhost.crt /etc/ssl/certs/localhost.crt | |
| COPY localhost.key /etc/ssl/private/localhost.key |
Next, update nginx.conf to load the certificate key pair. Configure a server to listen on port 443 over ssl and forward requests to the upstream web-api server. Also configure a server to listen on port 80 and redirect requests to port 443.
| worker_processes 1; | |
| events { worker_connections 1024; } | |
| http { | |
| sendfile on; | |
| upstream web-api { | |
| server api:5000; | |
| } | |
| server { | |
| listen 80; | |
| server_name localhost; | |
| location / { | |
| return 301 https://$host$request_uri; | |
| } | |
| } | |
| server { | |
| listen 443 ssl; | |
| server_name localhost; | |
| ssl_certificate /etc/ssl/certs/localhost.crt; | |
| ssl_certificate_key /etc/ssl/private/localhost.key; | |
| location / { | |
| proxy_pass http://web-api; | |
| proxy_redirect off; | |
| proxy_http_version 1.1; | |
| proxy_cache_bypass $http_upgrade; | |
| proxy_set_header Upgrade $http_upgrade; | |
| proxy_set_header Connection keep-alive; | |
| proxy_set_header Host $host; | |
| proxy_set_header X-Real-IP $remote_addr; | |
| proxy_set_header X-Forwarded-For $proxy_add_x_forwarded_for; | |
| proxy_set_header X-Forwarded-Proto $scheme; | |
| proxy_set_header X-Forwarded-Host $server_name; | |
| } | |
| } | |
| } |
Lastly, edit the docker-compose.yml file to expose both ports 80 and 443.
| ports: | |
| - "80:80" | |
| - "443:443" |
Run docker-compose build, followed by docker-compose up -d. This time when you browse to http://localhost/weatherforecast, you’ll be redirected to https://localhost/weatherforecast.

Happy coding!


How to ensure the api service is not faulted and restart it if it needs ?
Hi Tony Thanx for a good article, I am wondering while at it, can you throw in Kafka in the mix, have you explored using kafka to communicate between dockerized .NET web apps and how would such an architecture look?
I am now exploring Kafka. For more info I recommend the book: Kafka, the Definitive Guide.
Thank you, Tony, It is very informative!
Hello Tony, I have just one question. You have trust the localhost certificate on macOS but how can we do the same on ubuntu server?
Great job, thanks. Sorry, but i didn’t understand, why we include in project localchost.conf file . Project hasn’t any dependensy to this file, or i’m a blindman) P.S Sorry for my english)))
Hello Mr Sneed , thank you for this post , how things work if we use nginx behind Swagger , please(i am using windows 10) . Best regards.Adel
Thanks, It’s working as expected in 2024 with .Net 8.0
Just a word, why api has depends on reverse_proxy ?
It could be reverse_proxy depends on api ?
Thanks