Part 3: Injecting Scripts with Gulp
This is the third part in a series of blog posts on Getting Visual Studio Code Ready for TypeScript:
- Compiling TypeScript to JavaScript
- Writing Jasmine Tests in TypeScript
- Injecting Scripts with Gulp (this post)
Leveraging Gulp
In the first and second post in this series I showed how you can use Gulp to automate common tasks such as compiling TypeScript to JavaScript and running Jasmine tests in a browser. While Gulp is not strictly necessary to perform these tasks, it allows you to chain together multiple tasks, which can give you a smoother workflow.

You can download a sample project with code for this blog post. You can also download my Yeoman generator for scaffolding new TypeScript projects for Visual Studio Code.
For example, we defined a “watch” task with a dependency on the “compile” task, so that Gulp performs a compilation before watching for changes in any TypeScript files. When changes are detected, the “compile” task is then re-executed.
gulp.task('compile', function () {

    exec('rm -rf dist && tsc -p src');
});

gulp.task('watch', ['compile'], function () {

    return gulp.watch('./src/**/*.ts', ['compile']);
});
Likewise, we defined a “test” task with a dependency on the “watch” task, so that changes to any TypeScript files will cause browser-sync to reload the browser when it detects that the JavaScript files have been re-generated.
gulp.task('test', ['watch'], function () {

    var options = {
        port: 3000,
        server: './',
        files: ['./dist/**/*.js',
                './dist/**/*.spec.js',
                '!./dist/**/*.js.map'],
        // Remaining options elided for clarity
    };

    browserSync(options);
});
Listing Tasks
While VS Code allows you to execute gulp tasks from within the editor, you may sometimes prefer to use Gulp from the Terminal (if for no other reason than to see all the pretty colors). To make this easier, we can use a plugin that will list all the tasks we’ve defined in our gulpfile.js. But before we get into that, we can make our lives easier by using a plugin called gulp-load-plugins, which will relieve us from having to define a separate variable for each plugin we wish to use. All we need to do is define a $ variable, then use it to execute other gulp plugins we’ve installed.
var $ = require('gulp-load-plugins')({ lazy: true });
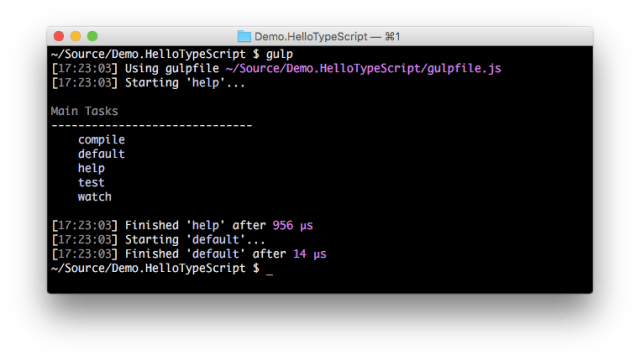
To list tasks in gulpfile.js, we can define a “help” task which uses the gulp-task-listing plugin to list all of our tasks. We’ll follow a convention which uses a colon in the task name to designate it as a sub-task. We can also define a “default” task which calls the “help” task when a user enters “gulp” in the Terminal with no parameters.
gulp.task('help', $.taskListing.withFilters(/:/));
gulp.task('default', ['help']);
You’ll need to install both Gulp plugins using npm.
npm install --save-dev gulp-load-plugins gulp-task-listing
Then open the Terminal, type “gulp” (no quotes) and press Enter. You should see a list of tasks displayed. To execute a task, simply type “gulp” followed by a space and the name of the task.
Injecting Scripts
In my last blog post I described how you can run Jasmine tests in a browser by serving up an HTML file which included both source and spec JavaScript files. But this required you to manually insert script tags into SpecRunner.html. You might have asked yourself if there might be a way to inject scripts into the spec runner automatically whenever you executed the “test” task. Well it just so happens: there’s plugin for that!™ It’s appropriately called gulp-inject, and you can add an injectScripts function to gulpfile.js which will inject scripts into SpecRunner.html based on globs for source and spec files.
var inject = require('gulp-inject');

function injectScripts(src, label) {

    var options = { read: false, addRootSlash: false };
    if (label) {
        options.name = 'inject:' + label;
    }
    return $.inject(gulp.src(src), options);
}
Now add a “specs:inject” gulp task which calls injectScripts to insert the source and spec scripts. Because we only intend to call this task from other tasks, we can classify it as a sub-task by inserting a colon in the task name.
gulp.task('specs:inject', function () {

    var source = [
        './dist/**/*.js',
        '!./dist/**/*.js.map',
        '!./dist/**/*.spec.js'];

    var specs = ['./dist/**/*.spec.js'];

    return gulp
        .src('./specrunner.html')
        .pipe(injectScripts(source, ''))
        .pipe(injectScripts(specs, 'specs'))
        .pipe(gulp.dest('./'));
});
The gulp-inject plugin will insert selected scripts at each location, based on a comment corresponding to the specified label. Simply edit SpecRunner.html to replace the hard-coded script tags with specially formatted comments. After running the “specs:inject” task, you should see the appropriate scripts inserted at these locations
<!-- inject:js -->
<!-- endinject -->

<!-- inject:specs:js -->
<!-- endinject -->
Injecting Imports
In addition to inserting source and spec scripts, you’ll also want to inject System.import statements into the spec runner so that system.js can provide browser support for module loading. For that you’ll need to install packages for glob, path, gulp-rename, and gulp-inject-string, then add an injectImports function to gulpfile.js.
var glob = require('glob');
var path = require('path');

function injectImports(src, label) {

    var search = '/// inject:' + label;
    var first = '\n    System.import(\'';
    var last = '\'),';
    var specNames = [];

    src.forEach(function(pattern) {
        glob.sync(pattern)
            .forEach(function(file) {
                var fileName = path.basename(file, path.extname(file));
                var specName = path.join(path.dirname(file), fileName);
                specNames.push(first + specName + last);
            });
    });

    return $.injectString.after(search, specNames);
}
Then add an “imports:inject” task which calls injectImports to insert system imports into a file called system.imports.js.
gulp.task('imports:inject', function(){

    gulp.src('./util/system.template.js')
        .pipe(injectImports(['/.dist/**/*.spec.js'], 'import'))
        .pipe($.rename('./util/system.imports.js'))
        .pipe(gulp.dest('./'));
});
Modify SpecRunner.html to replace the script that uses System.import with a reference to system.imports.js.
<script src="util/system.imports.js"></script>
When you execute the “imports:inject” gulp task, it will search a file called system.template.js for a triple-dash comment with the text “inject:import”, where it will inject imports for each spec file. The result will be written to system.imports.js.
Promise.all([
    /// inject:import
    System.import('dist/greeter/greeter.spec'),
    System.import('dist/italiangreeter/italiangreeter.spec')
]);
Lastly, you need to update the “test” task in gulpfile.js to add the two sub-tasks for injecting scripts and imports. This will ensure they are executed each time you run your tests.
gulp.task('test', ['specs:inject', 'imports:inject', 'watch'], function ()
Debugging Gulp Tasks
If you run into problems with any gulp tasks, it would help if you could set breakpoints in gulpfile.js, launch a debugger and step through your code to see what went wrong. You can do this in VS Code by adding an entry to the “configurations” section of your launch.json file, in which you invoke gulp.js and pass a task name.
{
    "name": "Debug Gulp Task",
    "type": "node",
    "request": "launch",
    "program": "${workspaceRoot}/node_modules/gulp/bin/gulp.js",
    "stopOnEntry": false,
    "args": [
        // Replace with name of gulp task to run
        "imports:inject"
    ],
    "cwd": "${workspaceRoot}"
}
If you set a breakpoint in the “imports:inject” task, select “Debug Gulp Task” from the drop down in the Debug view in VS Code and press F5, it will launch the debugger and stop at the breakpoint you set. You can then press F10 (step over) or F11 (step into), view local variables and add watches.

Learning Gulp
If you would like to learn more about Gulp, I highly recommend John Papa’s Pluralsight course on Gulp, where he explains how to use Gulp to perform various build automation tasks, such as bundling, minification, versioning and integration testing. While the learning curve may appear steep at first, Gulp will make your life easier in the long run by automating repetitive tasks and allowing you to chain them together for a streamlined development workflow.


