Part 2: Writing Jasmine Tests in TypeScript
This is the second part in a series of blog posts on Getting Visual Studio Code Ready for TypeScript:
- Compiling TypeScript to JavaScript
- Writing Jasmine Tests in TypeScript (this post)
Jasmine vs Mocha + Chai + Sinon

There are numerous JavaScript testing frameworks, but two of the most popular are Jasmine and Mocha. I won’t perform a side-by-side comparison here, but the main difference is that Mocha does not come with built-in assertion and mocking libraries, so you need to plug in an assertion library, such as Chai, and a mocking library, such as Sinon. Jasmine, on the other hand, includes its own API for assertions and mocks. So if you want to keep things simple with fewer moving parts, and you don’t need extra features offered by libraries such as Chai and Mocha, Jasmine might be a more appealing option. If, on the other hand, you want more flexibility and control, and you want features offered by dedicated assertion and mocking libraries, you might want to opt for Mocha. For simplicity I’m going to stick with Jasmine in this blog post, but feel free to use Mocha if that better suits your purpose.
You can download a sample project with code for this blog post. You can also download my Yeoman generator for scaffolding new TypeScript projects for Visual Studio Code.
Update: Since first publishing this blog post, I added a section on Debugging Jasmine Tests in VS Code, which you can find at the end of the article.
Using Jasmine with TypeScript
Jasmine is a behavior-driven development testing framework, which allows you to define test suites through one or more nested describe functions. Each describe function accepts a string argument with the name of the test suite, which is usually the name of the class or method you are testing. A test suite consists of one or more specs, formulated as a series of it functions, in which you specify expected behaviors.
Let’s say you have a Greeter class written in TypeScript, and it has a greet function.
namespace HelloTypeScript {
    export class Greeter {
        constructor(public message: string) {

        }
        greet(): string {
            return "Hello " + this.message;
        }
    }
}
Notice that Greeter is defined within the namespace HelloTypeScript and is qualified with the export keyword. This removes Greeter from the global scope so that we can avoid potential name collisions.
To use Jasmine we’ll need to install jasmine-core (not jasmine) using npm (Node Package Manager). Because we’re only using Jasmine at development-time, we’ll save it to the package.json file using the –save-dev argument.
npm install --save-dev jasmine-core
Intellisense for Jasmine
To allow Visual Studio Code to provide intellisense for Jasmine, you’ll need to install type definitions using Typings, which replaces the deprecated Tsd tool from Definitely Typed.
npm install -g typings
Use Typings to install type definitions for jasmine.
typings install jasmine --save-dev --ambient
This command will result in the addition of a typings folder in your project, which contains a main.d.ts file with references to installed type definitions. The –save-dev argument will persist the specified typing as a dev dependency in a typings.json file, so that you can re-install the typings later. The –ambient argument is required to include Definitely Typed in the lookup.
Now you’re ready to add your first Jasmine test. By convention you should use the same name as the TypeScript file you’re testing, but with a .spec suffix. For example, the test for greeter.ts should be called greeter.spec.ts and be placed in the same folder.
/// <reference path="../../typings/main.d.ts" />

describe("Greeter", () => {

    describe("greet", () => {

        it("returns Hello World", () => {

            // Arrange
            let greeter = new HelloTypeScript.Greeter("World");

            // Act
            let result = greeter.greet();

            // Assert
            expect(result).toEqual("Hello World");
        });
    });
});
The triple-slash reference is needed for intellisense to light up. Without it you’ll see red squigglies, and VS Code will complain that it cannot find the name ‘describe’.
When you press Cmd+B to compile your TypeScript code, you will see a greeter.spec.js file in the dist/greeter directory, where the greeter.js file is also located. You’ll also see a greeter.spec.js.map file to enable debugging of your Jasmine test. (See the first post in this blog series for information on how to configure VS Code for compiling and debugging TypeScript.)
Running Jasmine Tests
To run your Jasmine tests in a browser, go to the latest release for Jasmine and download the jasmine-standalone zip file. After extracting the contents of the zip file, copy both the lib folder and SpecRunner.html file to your project folder. Edit the html file to include both the source and spec files.
<!-- include source files here... -->
<script src="dist/greeter/greeter.js"></script>

<!-- include spec files here... -->
<script src="dist/greeter/greeter.spec.js"></script>
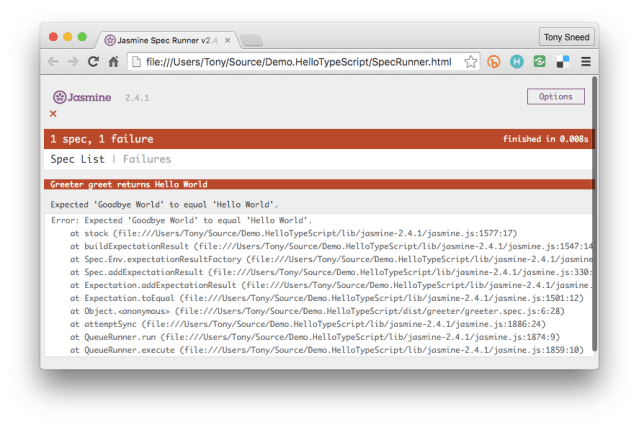
You can then simply open SpecRunner.html in Finder (Mac) or File Explorer (Windows) to see the test results.

If you change Greeter.greet to return “Goodbye” instead of “Hello”, then compile and refresh the browser, you’ll see that the test now fails.
Running Tests Automatically
Having to refresh the browser to see test results can become tedious, so it’s a good idea to serve your tests using http. To help with this you can use a task runner such as Gulp, which integrates nicely with VS Code, together wish an http server such as BrowserSync.

First, you’ll want to install gulp and browser-sync locally.
npm install --save-dev gulp browser-sync
Next, add a gulpfile.js file to the project, in which you’ll define tasks for compiling TypeScript to JavaScript, as well as watching TypeScript files and recompiling them when there are changes.
var gulp = require('gulp');
var exec = require('child_process').exec;
var browserSync = require('browser-sync');

gulp.task('compile', function () {
    exec('rm -rf dist && tsc -p src');
});

gulp.task('watch', ['compile'], function () {
    return gulp.watch('./src/**/*.ts', ['compile']);
});
To run either the compile or watch tasks, we can execute them from a Terminal or Command Prompt. (You can also run tasks in VS Code by pressing Cmd+P, typing “task ” [no quotes] and entering the task name).
gulp watch

If you change a TypeScript file, the gulp watch task will detect the change and execute the compile task. You can then add a gulp task which serves both .js and .spec.js files in a browser.
gulp.task('test', ['watch'], function () {

    var options = {
        port: 3000,
        server: './',
        files: ['./dist/**/*.js',
                './dist/**/*.spec.js',
                '!./dist/**/*.js.map'],
        logFileChanges: true,
        logLevel: 'info',
        logPrefix: 'spec-runner',
        notify: true,
        reloadDelay: 1000,
        startPath: 'SpecRunner.html'
    };

    browserSync(options);
});
Running Tests in VS Code
It is possible to wire up the gulp test task so that it runs in response to pressing Cmd+T. To set up VS Code both for compiling TypeScript and running tests, press Cmd+Shift+P, type “config” and select Configure Task Runner. Replace the default content for tasks.json with the following:
{
    "version": "0.1.0",
    "command": "gulp",
    "isShellCommand": true,
    "args": [
        "--no-color"
    ],
    "tasks": [
        {
            "taskName": "compile",
            "isBuildCommand": true,
            "showOutput": "silent",
            "problemMatcher": "$gulp-tsc"
        },
        {
            "taskName": "test",
            "isTestCommand": true,
            "showOutput": "always"
        }
    ]
}
Pressing Cmd+B will compile your TypeScript files, and pressing Cmd+T will serve your Jasmine tests in a browser, automatically refreshing the browser each time any of your TypeScript files changes.
Using Modules
To improve encapsulation TypeScript supports the use of modules, which are executed in their own scope, not in the global scope. Various constructs, such as variables, functions, interfaces and classes, are not visible outside a module unless they are explicitly exported. For example, we could define an ItalianGreeter class with an export statement.
export default class ItalianGreeter {
    constructor(public message: string) {

    }
    greet(): string {
        return "Ciao " + this.message;
    }
}
The Jasmine test for ItalianGreeter would then require an import statement.
import ItalianGreeter from "./italiangreeter";

let greeter = new ItalianGreeter("World");

// Remaining code elided for clarity
To use modules in TypeScript you’ll need to specify a module loader in your tsconfig.json file. For a TypeScript library or node.js app, you would select commonjs.
{
    "compilerOptions": {
    "module": "commonjs",

// Remaining code elided for clarity
At this point your TypeScript will compile, but the additional tests will not show up in SpecRunner.html, even after you include scripts for the source and spec files. The reason is that you need SystemJs, which acts as a polyfill to provide support in the browser for module loading, which is a feature of ECMA Script 2015. First add systemjs to your project.
npm install --save-dev systemjs
Then add these two scripts to SpecRunner.html.
<script src="node_modules/systemjs/dist/system.js"></script>
<script>
    System.config({ packages: { 'dist': {defaultExtension: 'js'}}});
    Promise.all([
        System.import('dist/greeter/greeter.spec'),
        System.import('dist/italiangreeter/italiangreeter.spec'),
    ]);
</script>
Pressing Cmd+T will now also serve italiangreeter.spec.js, which imports the ItalianGreeter class.

Stopping Tests in VS Code
You can terminate the test task by pressing Cmd+Shift+P and selecting Terminate Running Task. Because this is something you’ll do often, you might want to add a keyboard shortcut for it. From the Code menu select Preferences / Keyboard Shortcuts, then add the following binding, which will terminate the running task by pressing Cmd+Shift+X.
[
    { "key": "shift+cmd+x", "command": "workbench.action.tasks.terminate" }
]
Debugging Tests in VS Code
While it may be useful to run Jasmine tests in a browser, there are times when you need to launch a debugger and step through your code one line at a time. Visual Studio Code makes it relatively painless to debug your tests. First you’ll need to install jasmine-node using npm.
npm install --save-dev jasmine-node
Then add the following entry to the “configurations” section of your launch.json file.
{
    "name": "Debug Tests",
    "type": "node",
    "request": "launch",
    "program": "${workspaceRoot}/node_modules/jasmine-node/bin/jasmine-node",
    "stopOnEntry": false,
    "args": [
        "dist",
        "--verbose"
    ],
    "cwd": "${workspaceRoot}",
    "sourceMaps": true,
    "outDir": "${workspaceRoot}/dist"
}
Press Cmd+Shift+D to view the Debugging pane in VS Code and select “Debug Tests” from the dropdown. Then set a breakpoint (pressing F9 will do the trick), and press F5 to launch the debugger. Execution should pause at the breakpoint, allowing you to step through your code.

What’s Next?
In this post I showed how to write Jasmine tests in TypeScript and serve them in a browser by running a Gulp task either from the Terminal or in Visual Studio Code. This has the advantage of automatically compiling TypeScript files and refreshing the browser whenever a source or spec file has changed. While this works well at development time, you’ll need to use a test runner such as Karma if you want to execute tests on a continuous integration server when commits are pushed to a remote repository. I’ll address this issue in my next post.


Finally a package that works as advertised. Great job!
–ambient is not valid anymore. Jasmine can’t be found by typings. This example is unusable. I think your intentions were good, here but the results were lackluster.
You are referring to the Yeoman generator? Or the sample? The best place to log an issue is on the GitHub repo for those. Typings is being deprecated altogether and replaced by packages.
@Stefen: I have updated both the Sample Project and the Yeoman Generator to use the latest version of TypeScript, which replaces typings with npm type packages. Everything should work now. So give it another try and let me know if you run into any issues. Remember that software is evolving all the time, and code for blog posts can quickly become outdated, which is particularly true of TypeScript, which has gone from version 1.x to 2.x.
Thanks for the sample. I got it working using namespaces, but the test never get found when using modules. I even downloaded the repo, did an npm update, and gulp test and no tests were found. If I changed the code back to using namespaces the test would be found. Any hints on why I’m having problem with modules?
@byamabe: I actually refactored the sample to use modules instead of namespaces. Check it out.
I tried the sample and the SpecRunner page shows “No specs found”
It’s possible you are attempting to run the sample on Windows. Unfortunately, I built the demo on a Mac, and there are some issues that need to be resolved in order to run it on Windows, especially in how file paths are handled.
I got the sample to work on Windows by opening system.imports.js in the util folder and pasting the following under
///inject:import:System.import('dist/greeter/greeter.spec'),
System.import('dist/italiangreeter/italiangreeter.spec')
Let me know if that works for you. I’ll have to go in and update the gulp task that injects imports.
I’m actually on a new 15″ MBP with TouchBar. I’ll keep poking around but please let me know if you think of something I might be missing.
Make sure you have the latest version of Node, then install gulp globally. From the terminal in project directory run: gulp test. You should see imports injected into system.js file and the tests should show up in browser
Thanks, Tony, installing gulp globally seems to have done the trick!
Hi,
I downloaded your project but cant get it working for Windows. Could you kindly help me please?
Regards,
Satya
@Kumar: See my comment above on code you need to insert into system.imports.js to get it working on Windows.
Sorry I did try that, but it still says “No specs found”.
Can you open an issue on the repo for the sample? Go here to post a new issue: https://github.com/tonysneed/Demo.HelloTypeScript/issues.
Then you can tell me more about your setup (Node, TypeScript, Gulp, etc), and we can find the reason the tests aren’t showing up.
You’re doing gods work but as someone coming from .net to look at web development, its so disheartening to find that things as basic as using a typed language and running unit tests have a plethora of half-working solutions that require pulling things together yourself and then wondering why it doesn’t work.
I want to focus on writing my application code and there just seems to be an incoherent platform to start off with.
@Lawrence, I had the same reaction when I first came to the world of TypeScript development with VS Code. However, I think a lot depends on what you’re trying to do. If you want to do front-end development with Angular, then you can just use the Angular CLI and everything just works. It uses webpack with Jasmine and Karma, and there’s no need for gulp. 🙂